
Cloud services are flexible and powerful, but without oversight, your costs can quickly escalate. In this step-by-step tutorial, I’ll walk you through using Azure Cost Management tools to monitor, analyze, and optimize your cloud expenses — without nasty billing surprises.
📌 What is Azure Cost Management ?Azure Cost Management is a suite of tools inside the Azure portal designed to help you:
- 📉 Track and analyze cloud spending
- 🔔 Set budgets and cost alerts
- 📊 Forecast future expenses
- 🛠️ Optimize resource usage and cut waste
💡 Why Managing Azure Costs Matters
Even small, forgotten services like idle virtual machines or old storage accounts can quietly drive up your cloud bill. Here’s why proactive cost management is essential:
- 📊 Stay within budget
- 🧭 Track spending across multiple teams or projects
- 🧹 Identify and clean up unused resources
- 🔍 Gain visibility into where your money’s actually going
How to Get Started with Azure Cost Management
Step 1: Access Cost Management in the Azure Portal
- Head to portal.azure.com and use the search bar to find Cost Management + Billing
- Select Cost Management in the sidebar

Step 2: Explore Cost Analysis
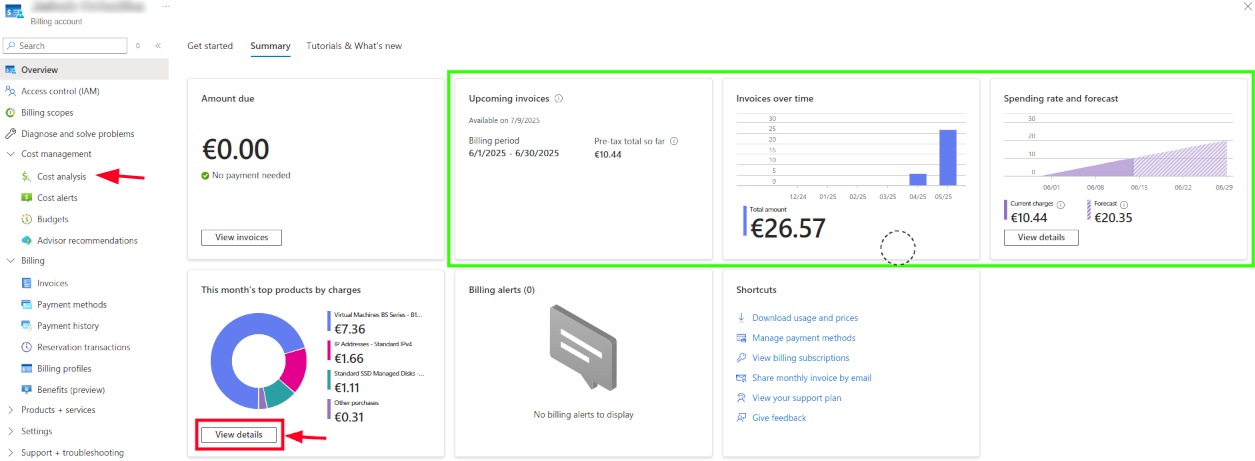
Inside the Cost Analysis dashboard, you can check both current and forecasted costs as shown in the image below. I marked the important dashboards with green rectangle. You might check your Upcoming Invoices to keep track of your current costs – same information, but forecasted is located under the Spending rate and forecast graph. Also, you might want to see the total amount of payments over the time under the Upcoming Invoices graph.
At the time of writing this post, I only have the one virtual machine running in the subscription – as shown in the graph This month’s top products by charges – to further explore the details click on the ‘View details’ button or by click on the ‘Cost analysis’ item under the ‘Cost management’ menu.
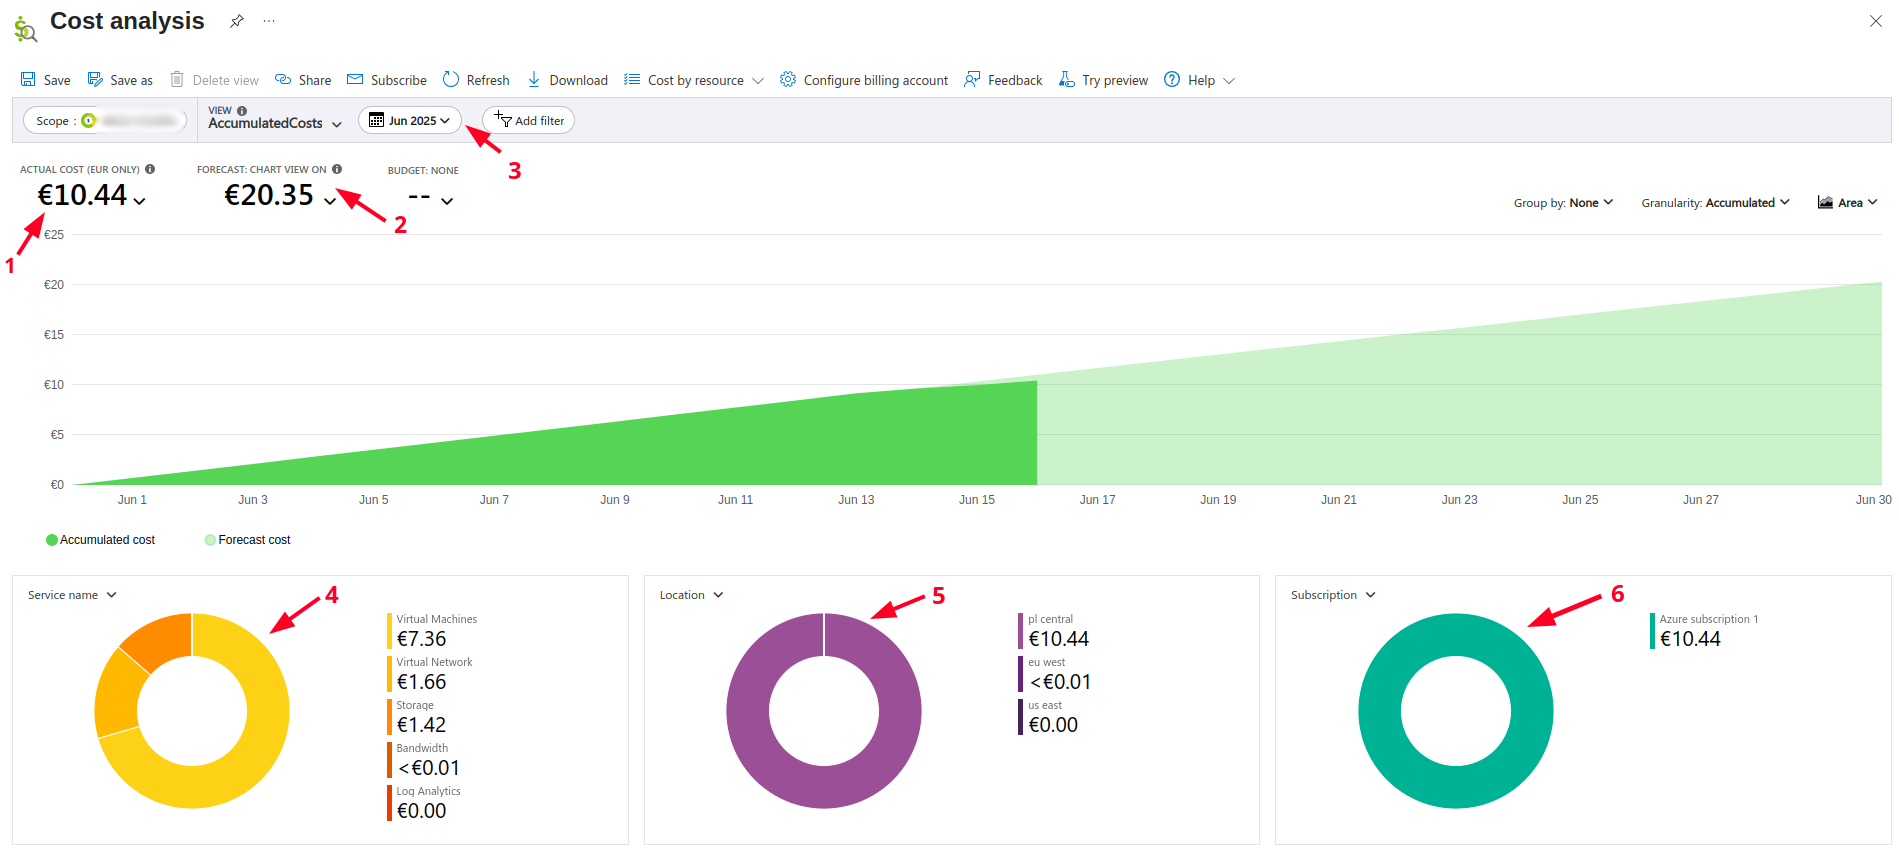
After that you are presented with detailed view of cost analysis as shown below. The view might be overwhelming at first, so I summarized it to 5 most important buttons / subgraphs:
- Actual cost – visualized as bright green color in the graph.
- Forecasted cost – visualized as pale green in the graph.
- Selected month – month for which cost analysis should be performed.
- Cost by services – as shown, for my case the biggest cost is the virtual machine itself as well as its associated components (virtual network and storage).
- Cost by location – in my case, VM is located in the PL central datacenter
- Location by subscription – I have only one subscription created for this account named ‘Azure subscription 1’
Step 3: Set Budgets and Alerts
It is a good idea and best practice to always use budgets. By doing so, you do not prevent the resources from spending more money than they should, but you can create alerts which will notify you when the budget is spent and then you can take further action, such as stopping the VM, deleting a resource, etc..
To create a budget and alerts:
- Go to Budgets
- Click Add

- Set your budget name, reset period, creation date, expiration date and an amount
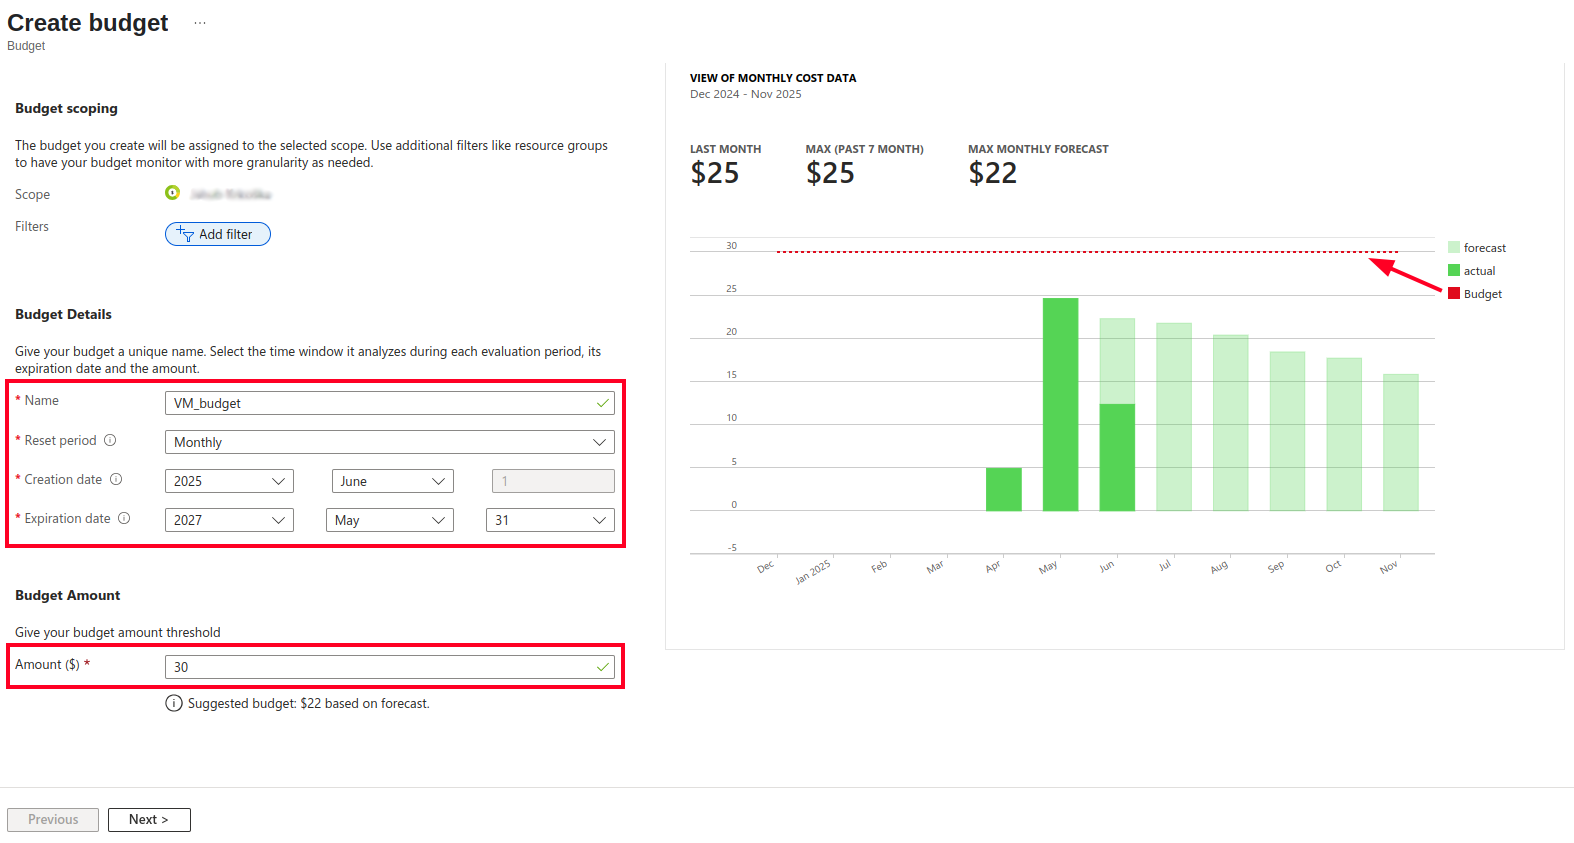
I pay around 25 dollars for my VM setup every month. In this case, I want to be sure to not pay more than 30 dollars. The budget is being reset every month. The graph displays spendings from recent months along with forecasted projections for the upcoming ones. The budget is visualized as red-dotted line.
Also, notice the scope in the upper part of the screen. I blurred it, because it contains my personal name and surname, but this is the billing account to which you apply the budget on. In the basic setup for your labs you probably use just one billing account, but in the enterprise it is not unusual to have multiple billing accounts to effectively manage the money resources.
- Click next
- Configure alert thresholds (e.g., at 70%, 90%, 100%)
- Choose email recipients for notifications
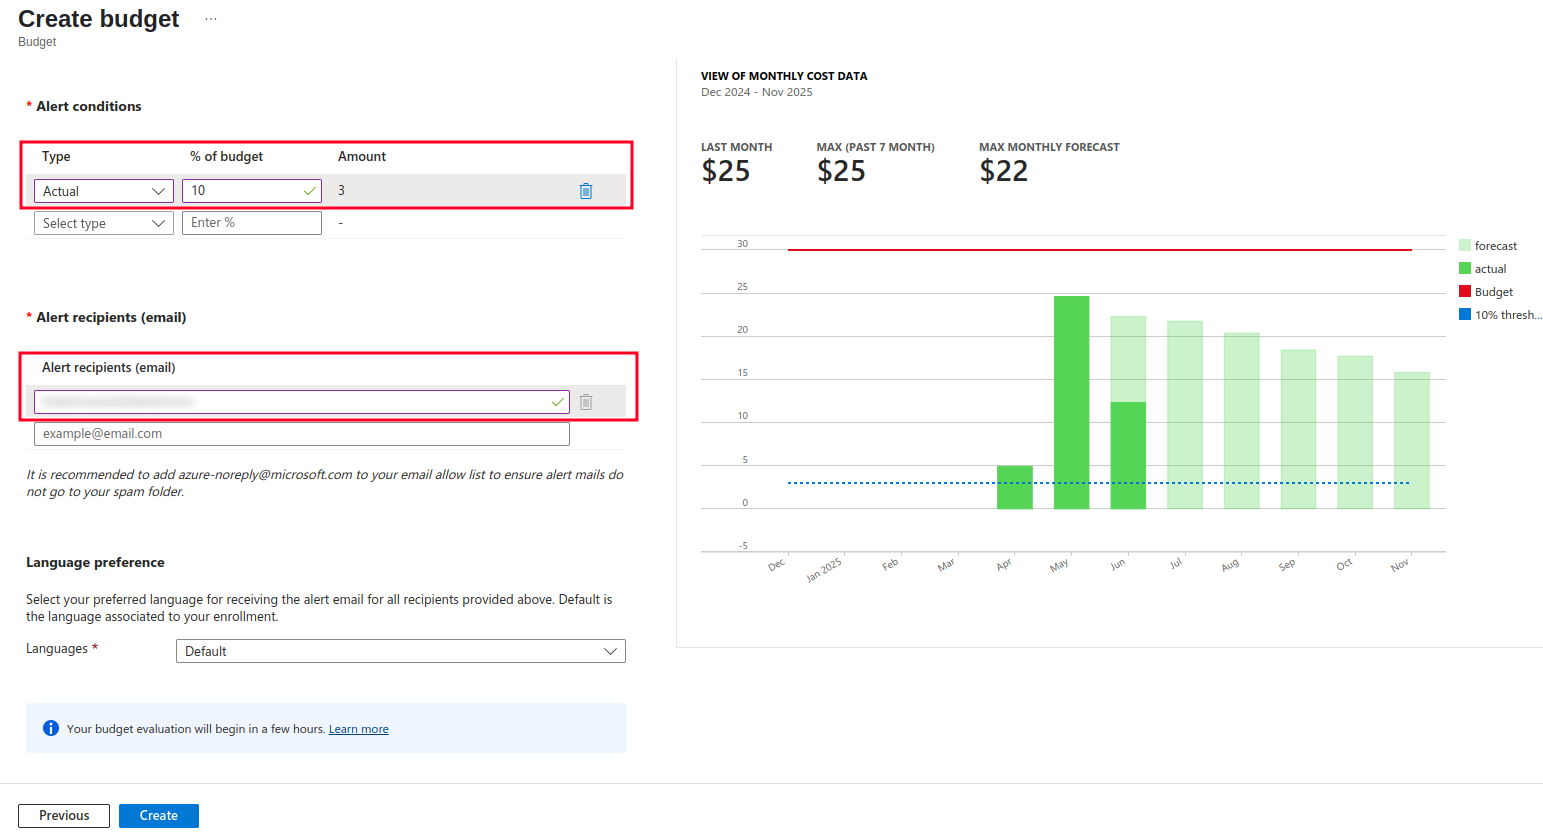
In this example, I configured the alert to trigger after the actual budget is over 10 percent. You can also configure alert to trigger on the forecasted budget as well. I used 10 percent just to show you the alerts which I received via email. You put the email address for alerts under the Alert recipients. In this case, I put just one email, but you are free to use multiple recipients as well.
- After you set up your values for alerts, click on Create button.
After the budget is created, it is necessary to wait 8-24 hours before it tracks your spendings. Also, if you have previously created some action groups, you can use them alongside with alert to trigger various other events, such as mobile push notification. Action groups are currently only supported for subscription and resource group scopes.
- After the waiting period is over, go to Budgets once again.
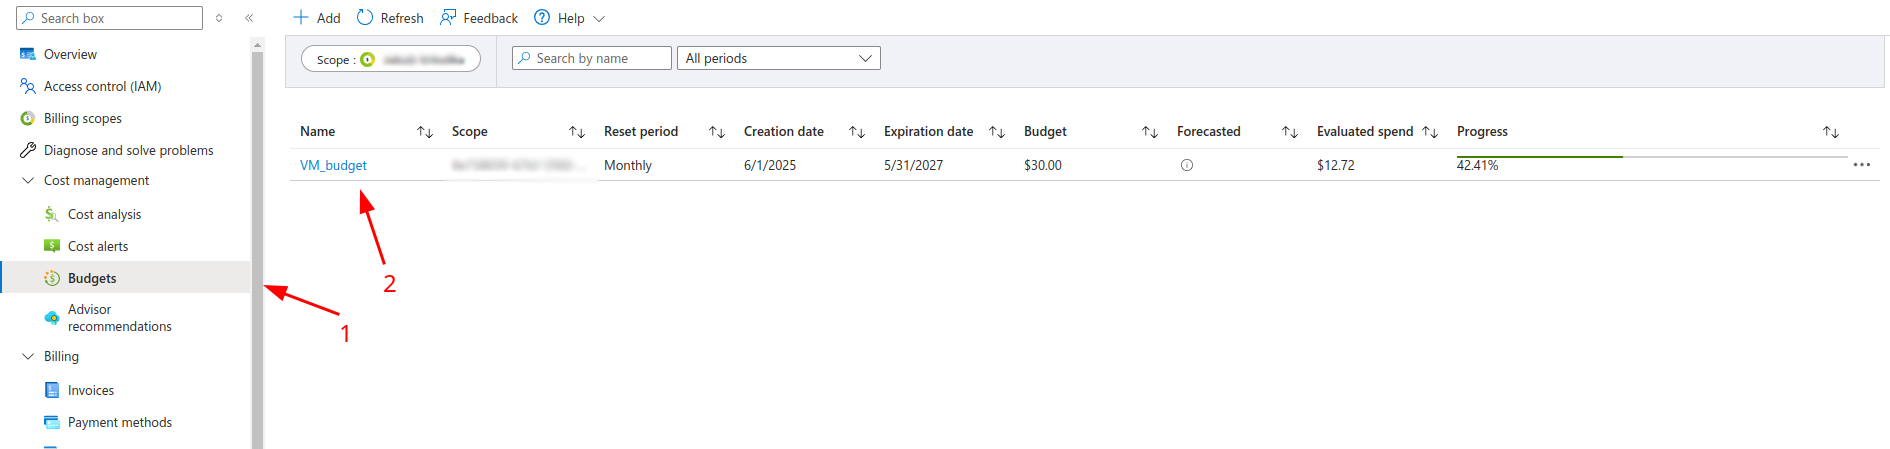
As you can see in the picture, the budget is created and there is also the progress bar showing the budget percentage.
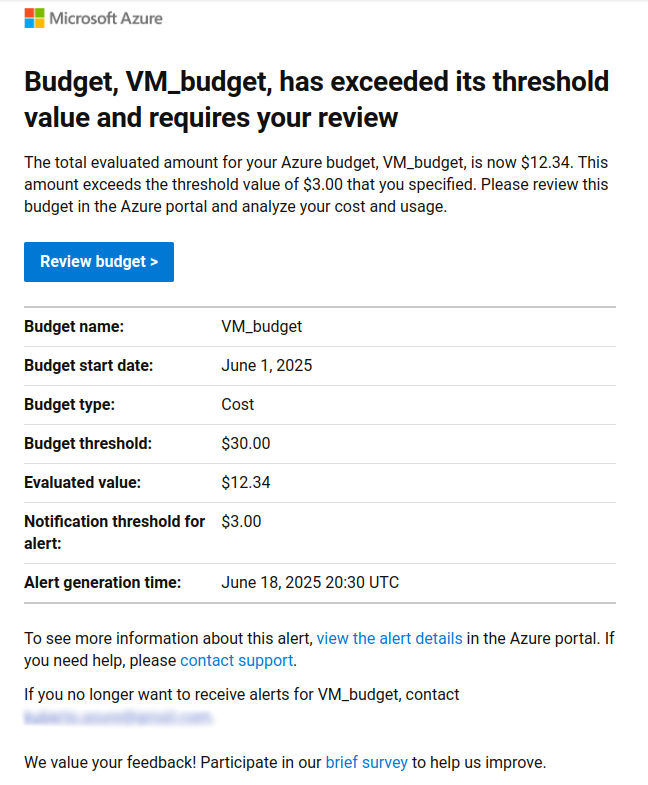
- Check the alert in email (if triggered)
In steps 4-6 I configured the alert to trigger after the current budget exceed the 10% threshold. The alert is shown below:
🧠 Quick Azure Cost Optimization Tips
- 🔌 Auto-stop idle VMs with Azure Automation
- 📏 Right-size resources to match actual demand
- 🏷️ Tag resources by department or project for better cost tracking
📅 Make Cost Reviews a Routine
Cloud costs evolve with your workloads. Set a weekly or monthly reminder to review:
- Cost Analysis reports
- Advisor Recommendations
- Budget thresholds
Bonus tip: 📧 Set up automated reports via Action Groups or Logic Apps for a hands-free update.
🎯 Final Thoughts
Azure’s pay-as-you-go flexibility is a major advantage — but only if you actively manage it. By following this tutorial, you’ll improve visibility, avoid bill shock, and make smarter, data-driven decisions about your cloud resources.