
Running your applications as containers has become a go-to strategy for modern cloud deployments. Containers offer consistency across environments, portability, and faster deployment times. If you’re using Azure App Service, you can easily deploy and run your app as a container—either from a public registry like Docker Hub, a private registry like Azure Container Registry (ACR), or even a custom container image.
In this post, I’ll walk you through the step-by-step process of running an Azure App Service as a container.
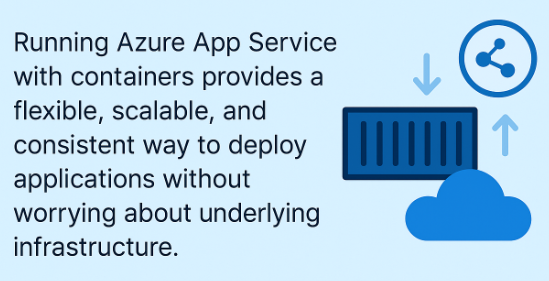
💡Why use Azure App Service with containers?
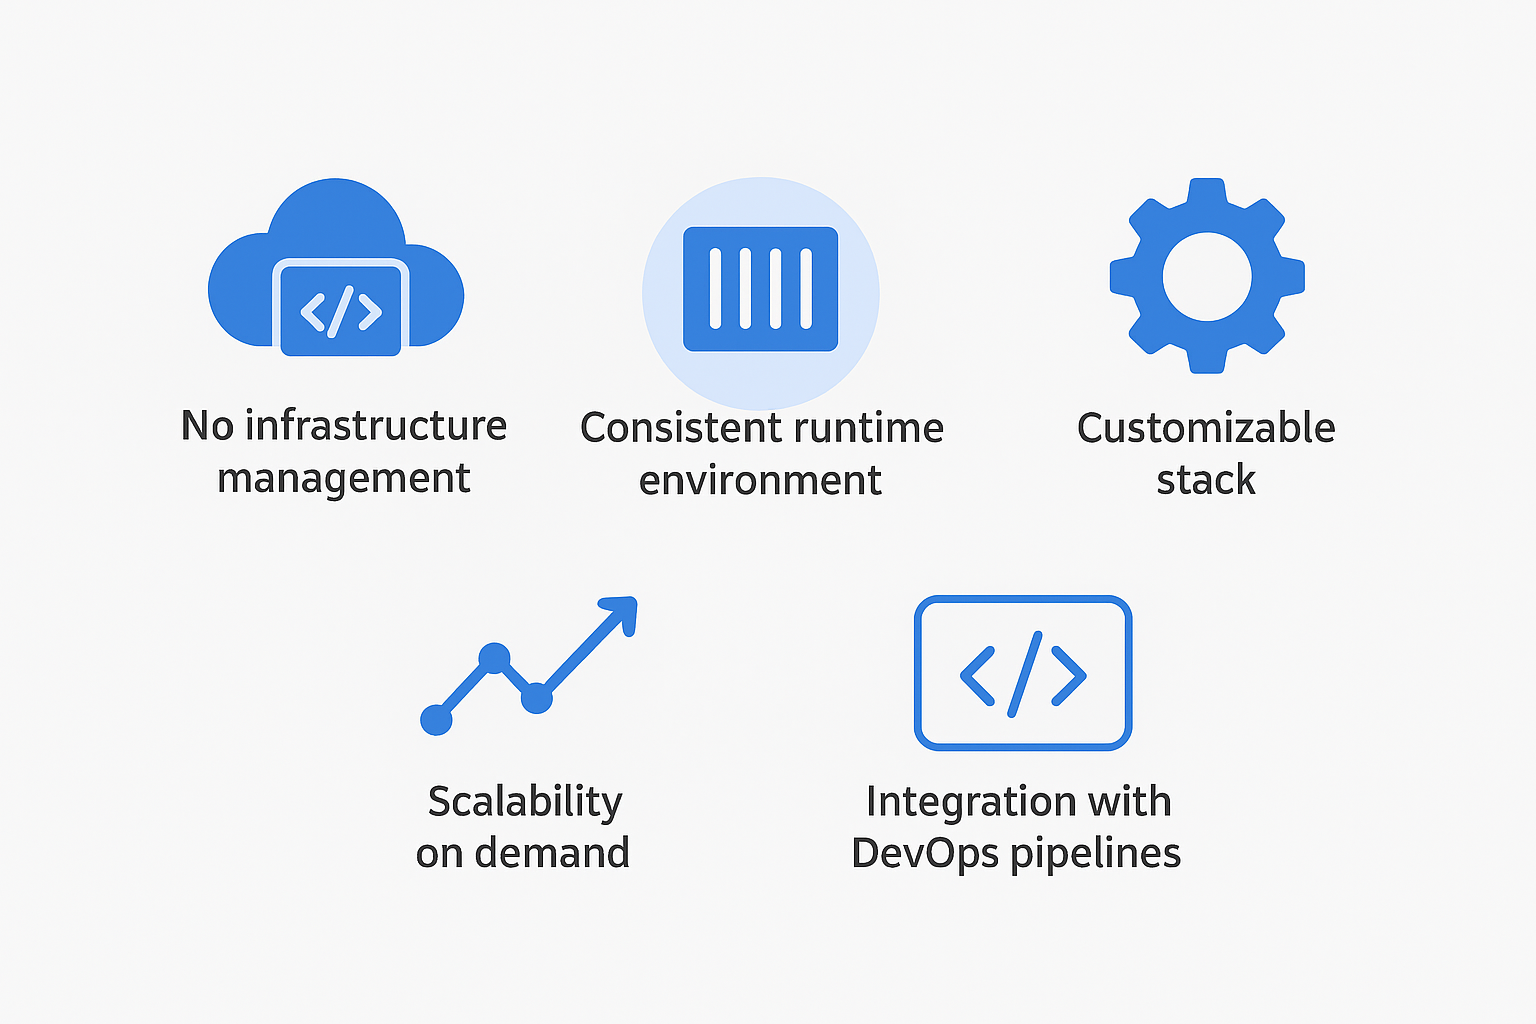
Before jumping into deployment, it’s worth understanding why this combination is so powerful:
No infrastructure management – You don’t need to provision servers, patch OS images, or manage load balancers. Azure App Service does all of that for you as it is managed by Azure.
Consistent runtime environment – By shipping your app in a container, you guarantee it runs the same way in dev, staging, and production. Images can be further customized, versioned by tags, etc.
Customizable stack – You’re not limited to the built-in App Service runtimes. You can bring your own base image, libraries, and OS-level dependencies. When running App Service as a code, it only supports Python, PHP, node, Java and .NET runtime environments.
Scalability on demand – You can scale up (bigger instance) or out (more instances) with a single click or automatically based on traffic with App Service plan.
Integration with DevOps pipelines – Containers are a natural fit for CI/CD workflows. Azure DevOps, GitHub Actions, or any other CI system can build and push container images. Alongside that, App Services support continuous delivery, automatically pulling a new image after deployment.
⚙️Create, build, deploy and run
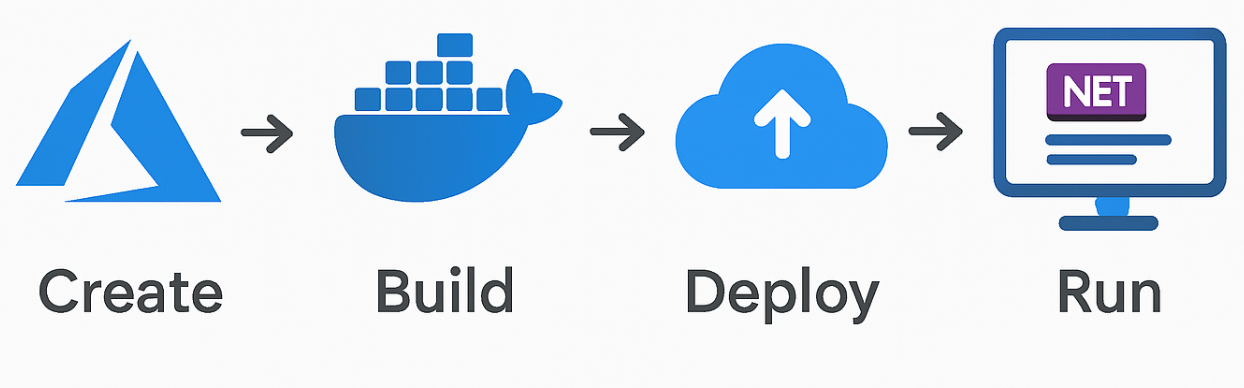
In this section, I will walk you through creating an Azure Container Registry (ACR), building the Docker image and pushing it to the registry, and finally deploying it to an App Service. I will also create Managed Identity for App Service to allow it to pull images from ACR using RBAC roles.
For the image, I will use a simple .NET application that displays incoming requests. All resources are available at my github: github.url
While demonstrating the deployment, I will first use the GUI, then include the Azure CLI commands, and finally use Terraform for all resources. Application Insights and a Log Analytics workspace will also be deployed, as they are essential for monitoring App Services and considered a best practice.
The application, Azure CLI scripts as well as terraform as available here.
Prerequisites
To follow along, make sure you have:
Azure Account – Sign up here if you don’t already have one.
Azure CLI – Download and install from Microsoft’s official docs.
Docker Installed – You’ll need Docker Desktop (or CLI tools) to build and run your container locally.
(Optional) Application Code + Dockerfile – If you already have your custom code with Dockerfile, you can also follow along. But be aware that autoinstrumentation in Application Insights for custom containers is only supported for a chosen stack of runtimes (.NET, Java, etc). To learn more about Application Insights in Azure, take a look on my other blog post.
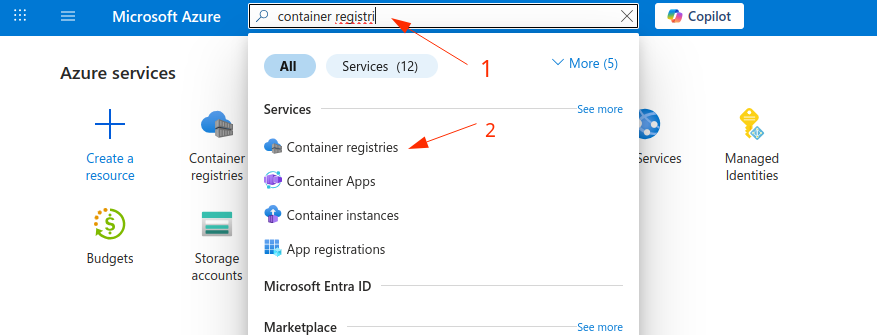
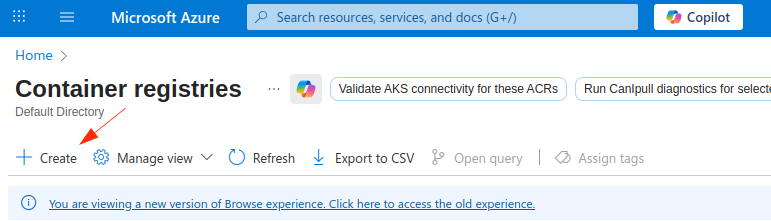
Create Azure Container Registry
1. Head to Azure Portal -> in search for Container registries and click on Create
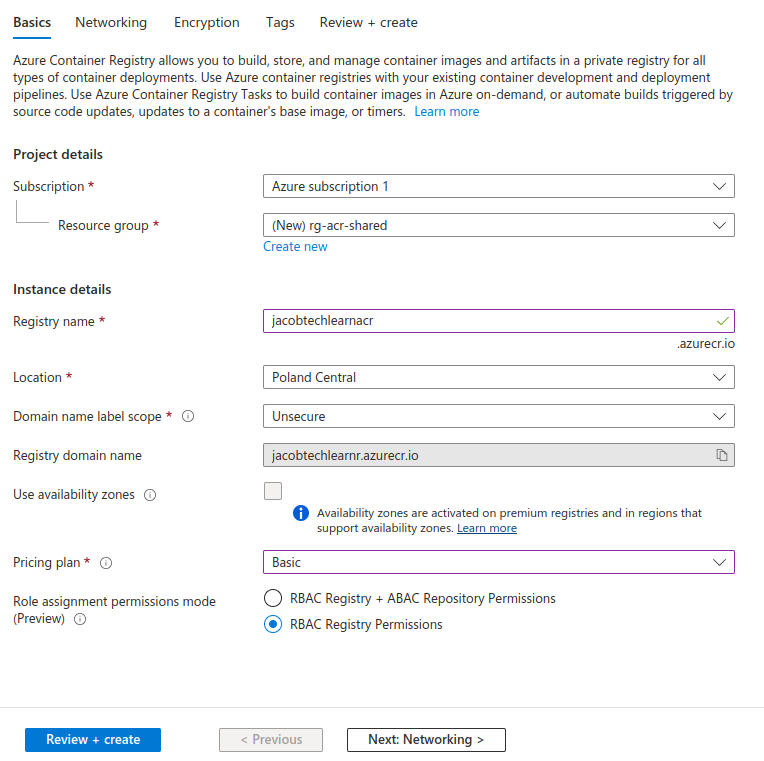
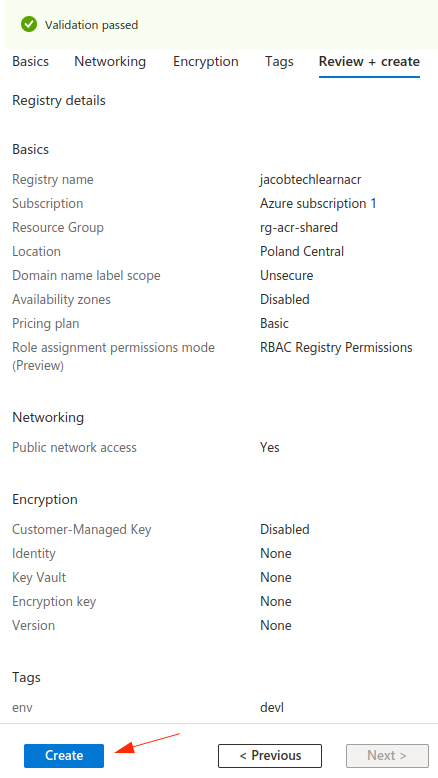
2. Fill out the basic parameters
In this tab you provide some basic properties, such as Resource group, Location, etc. In my case, I chose Poland Central as my region, as it is closest to me. I also used Basic princing plan, but for the production use you would typically use Standard or Premium. If you care about security, you can also choose different Domain name label scope, but for this tutorial purpose, I used Unsecure option. I also chose to use RBAC for permissions, as ABAC is also outside the scope. Availability zones are also not possible with Basic SKU.
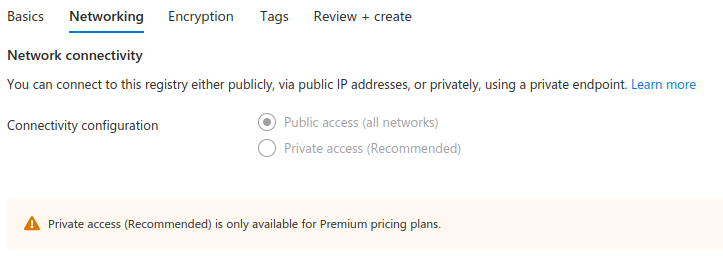
3. Skip through the Networking tab
As we chose to use Basic pricing plan, we do not have an option to use the Private access option. But once again, you would typically use it in production environment.
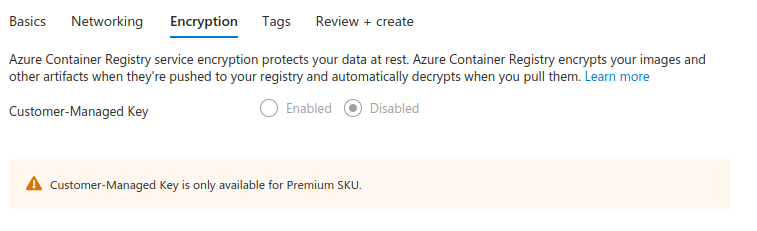
4. Skip through the Encryption tab
For the same reason as before, we skip through the Encryption tab. If you were to manage your own keys, you would use Premium plan.
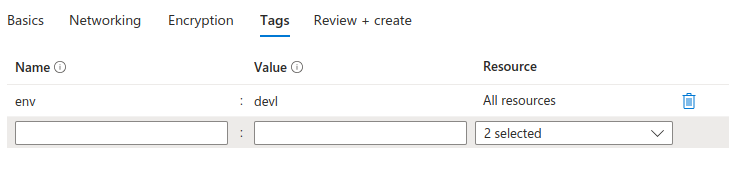
5. Add tags
It is considered best practice to use tags with your resources. For this demonstration, I added an env tag with the value devl to simulate a development environment.
6. Finally Review and Create
Finally, review the attributes and create the resource.
Create ACR using Azure CLI
To deploy the same ACR (Azure Container Registry) using the Aure CLI use the following set of commands:
az group create --name rg-acr-shared --location polandcentral

az acr create \
    --resource-group rg-acr-shared \
    --name jacobtechlearnacr \
    --sku Basic \
    --tags env=devl
Note: Admin option
Although later in this post I showcase how to use managed identity to pull the Docker image, there is also an admin option. Admin has full permissions to the registry. In general, it is not recommended to use this option, as it includes credentials and gains full access. However, If you want to enable this option anyway, or if you have some specific use case, you can do in the portal or by adding –admin-enabled true option to az acr create command.
Build and push Docker image to ACR
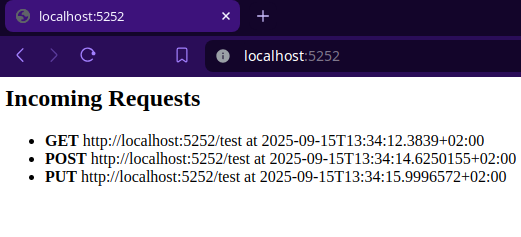
The next step is to build our app and deploy it to created ACR. My app is a simple ASP .NET Core API, which logs GET, POST and PUT API requests made to the “/test” endpoint and displays them on the root endpoint “/” as shown in the picture below. The full description of app is present in this Github repository.
1. Download the app from GitHub; the Dockerfile is already included.
2. Build the image with Dockerfile present in app
docker build -t requestloggerapp .3. Tag the image with the domain name from your ACR and include the repository in the path
In my case, the domain name is jacobtechlearnacr.azurecr.io. Path represents the repository, which will be created for the Docker image. It should represent the app itself; therefore I used requestloggerapp for the path.
Final tag is jacobtechlearnacr.azurecr.io/requestloggerapp.
docker tag requestloggerapp:latest jacobtechlearnacr.azurecr.io/requestloggerapp4. Authenticate to ACR
Next step is to authenticate to the created ACR. To do so, use the following AZ CLI command. Put the name of your ACR after the –name parameter.
az acr login --name jacobtechlearnacr5. Finally, push the Docker image to ACR
Now that the authentication is done, we can finally push the image using the docker push command.
docker push jacobtechlearnacr.azurecr.io/requestloggerappCreate App Service with Managed Identity
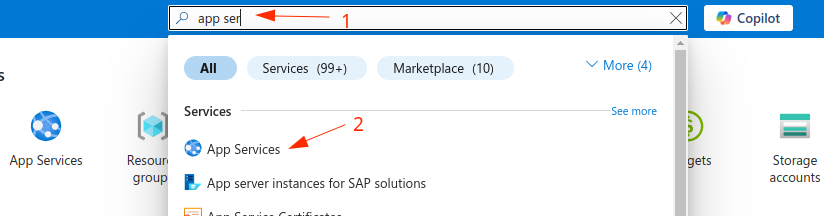
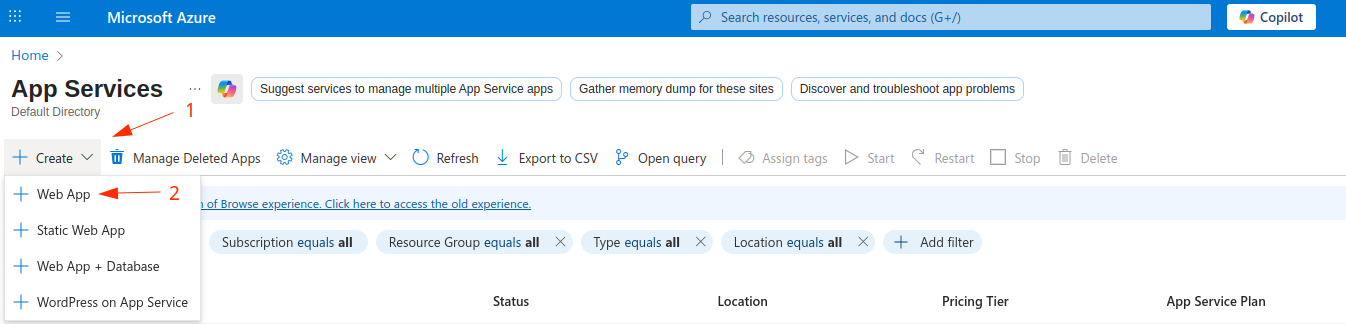
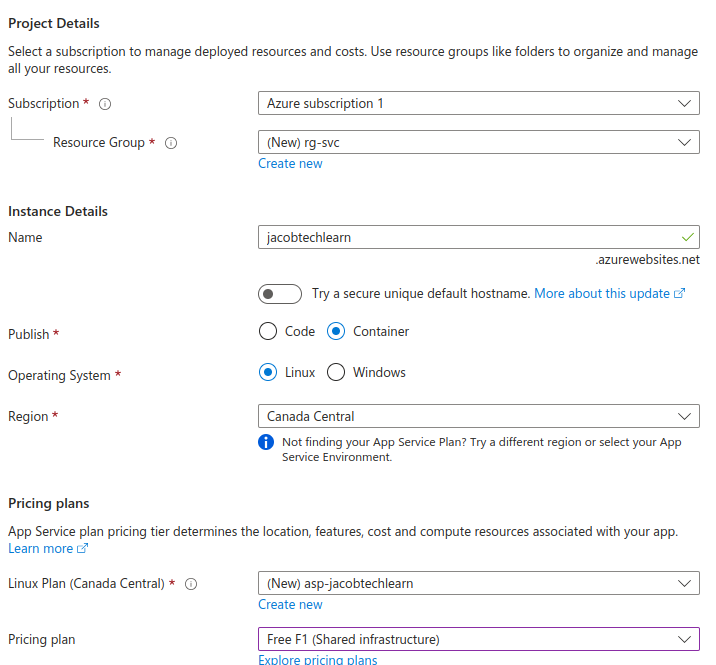
1. Head to Azure Portal -> search for App Services and click on Create -> Select Web App
2. Fill out the basic parameters
As with ACR, we also need to provide some basic parameters. For demonstration purposes, I chose not to use a unique default hostname. However, outside of this tutorial, it is considered a best practice to use one, as it helps prevent attackers from performing domain takeovers.
Choose container option alongside with Linux operating system. Even though you can choose Windows, by doing so you will not be able to create a free Service Plan. Create a new Linux plan with F1 SKU, so that you can freely try this deployment without any costs. Skip the Zone Redundancy part as it is not available for this plan.
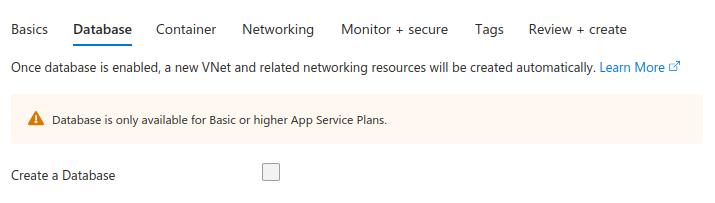
3. Skip through the Database tab
As we chose to use free Service Plan, we do not have the option to create a database. If you deploy your custom app and you want to also create a database, you should choose different plan, such as Basic or Premium.
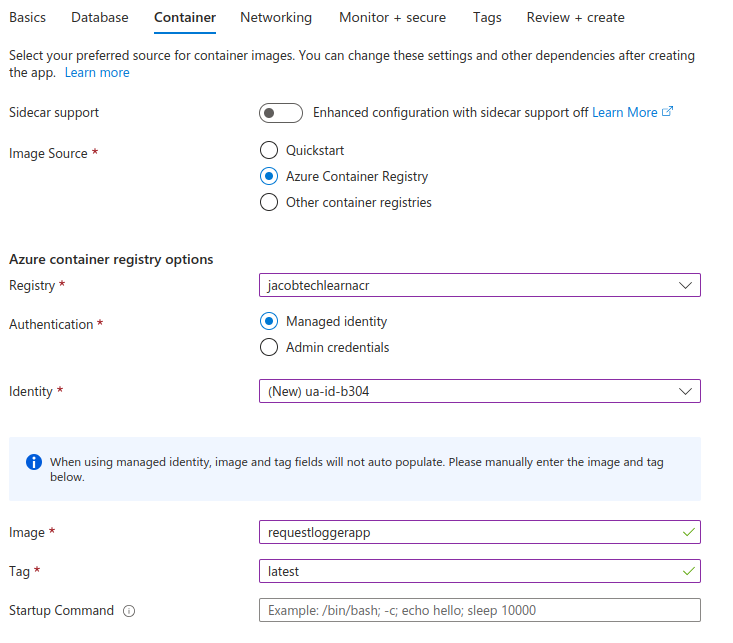
4. Fill out the Container tab
The next step is to fill out the container details. Choose Azure Container Registry as an image source. Then choose your created ACR from the dropdown menu. Select Managed Identity option for the authentication. Click on dropdown menu next to the identity property and select the option to create the new one (this will create new user-assigned managed identity). You can also choose to use the existing one if you can/want. Lastly, fill out the image details.
You can also enable Sidecar support. For the simplicity of this tutorial, I did not use this option.
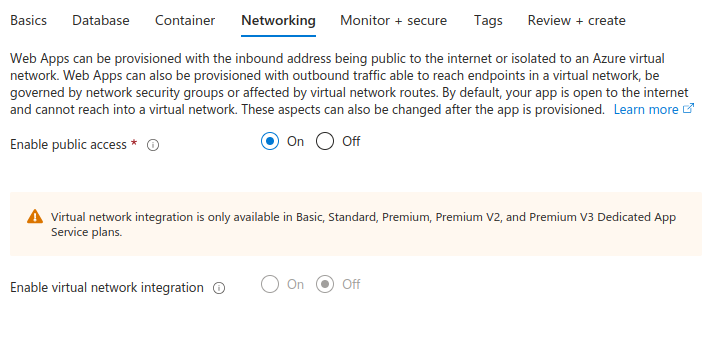
5. Fill out the Networking tab
For the networking just enable the public access. If you want to isolate your app with VNET, you can do so, but only with Linux plan with at least a Basic SKU.
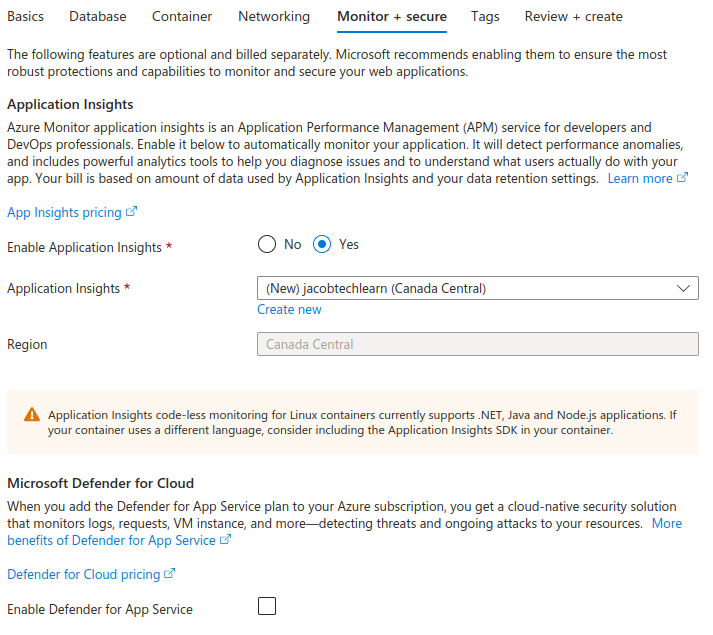
6. Fill out the Monitor + Secure tab
For monitoring of the application, enable Application Insights. Choose to create a new one, or an existing one.
You can also enable Defender for App Service if you want to enforce security.
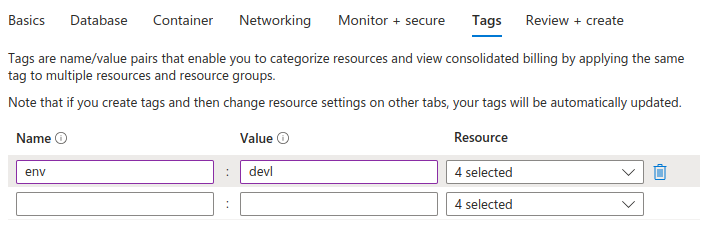
7. Add tags
As with ACR, I also chose to add env tag with the value of devl, indicating that this is a development environment.
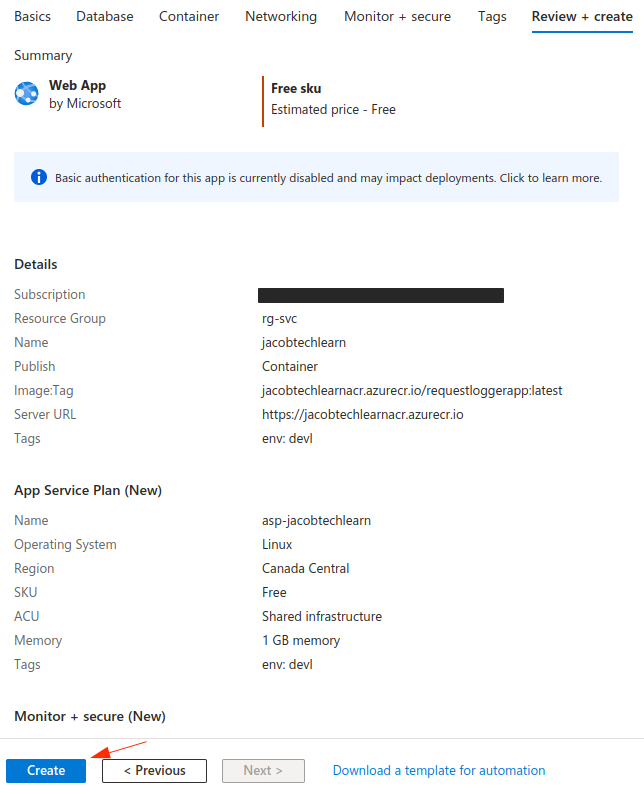
8. Finally Review and Create
Once again, review the attributes and create the resources.
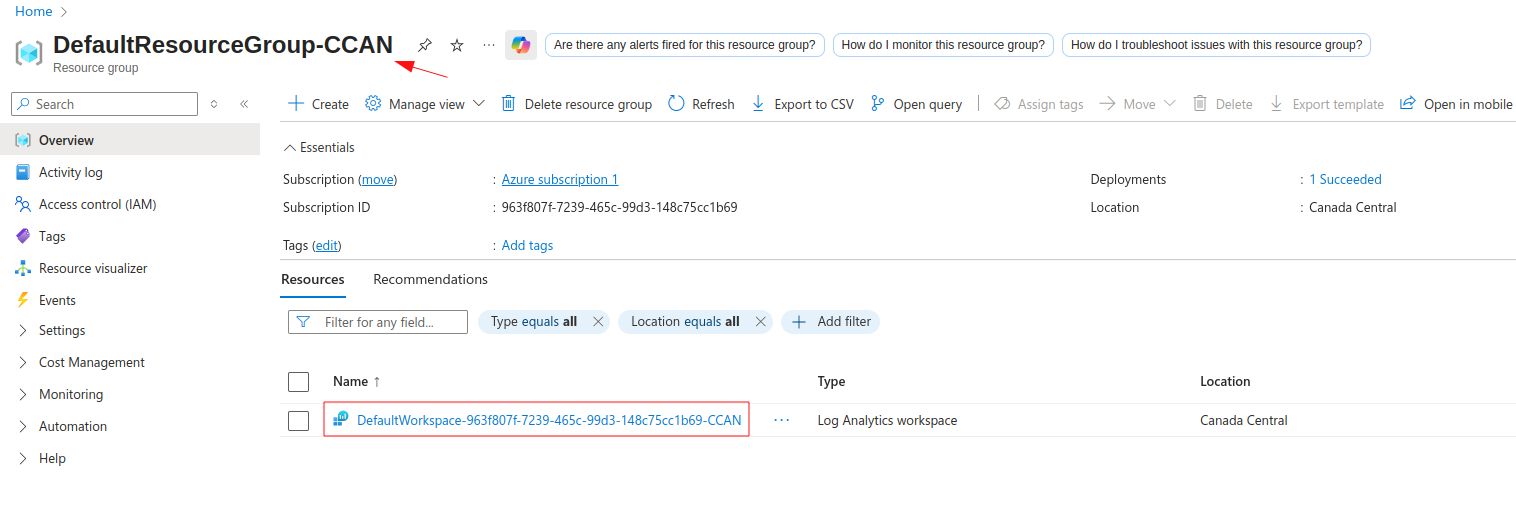
Reviewing the deployment
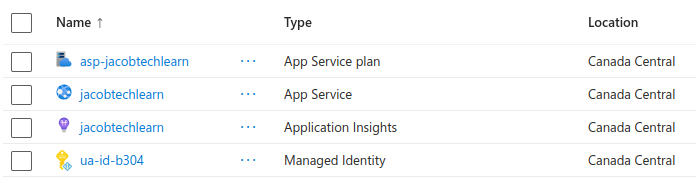
If your deployment was successful, you should have five newly-created resources. Four of them are located in the selected resource group previously, but the fifth one – log analytics workspace was created automatically in the resource group called DefaultResourceGroup- {selected region}. In this case, I chose to use Canada Central region and therefore my log analytics workspace was created in resource group called DefaultResourceGroup-CCAN.
Other created resources:
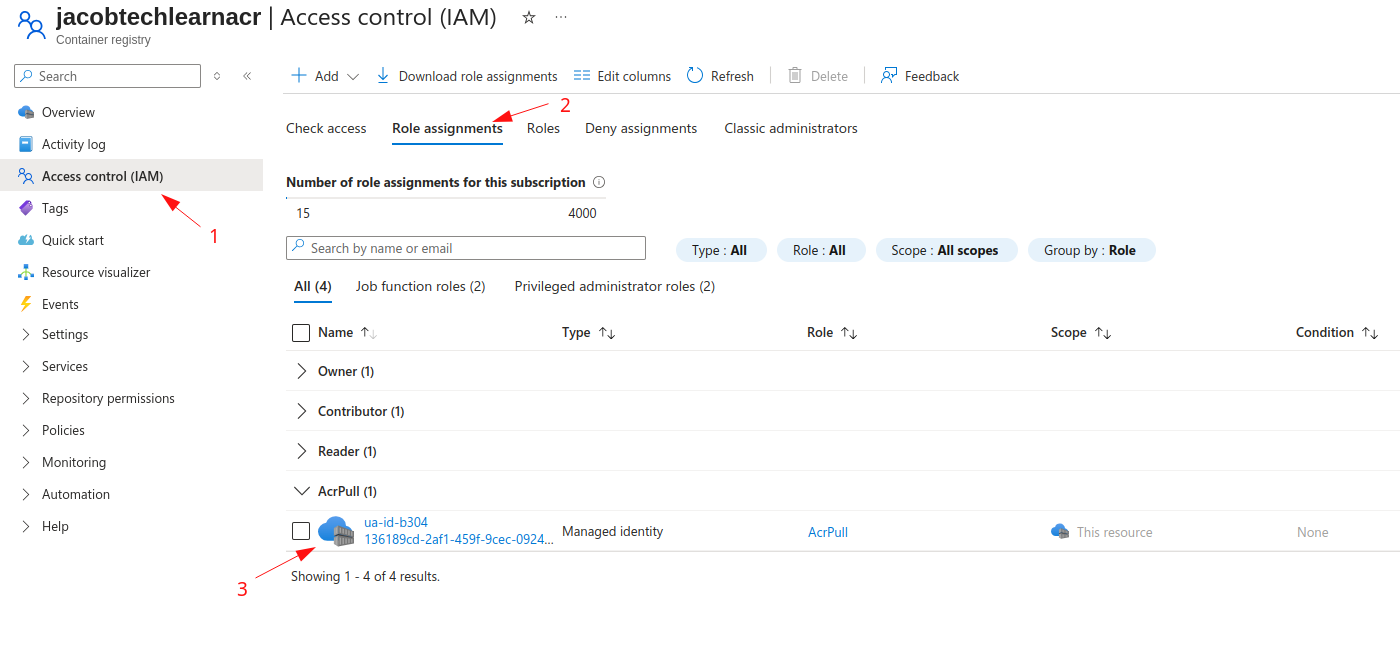
When we created the resources, in the background Azure assigned AcrPull role to created managed identity.
To see this role assignment go to ACR -> Access control (IAM) -> Role Assignments:
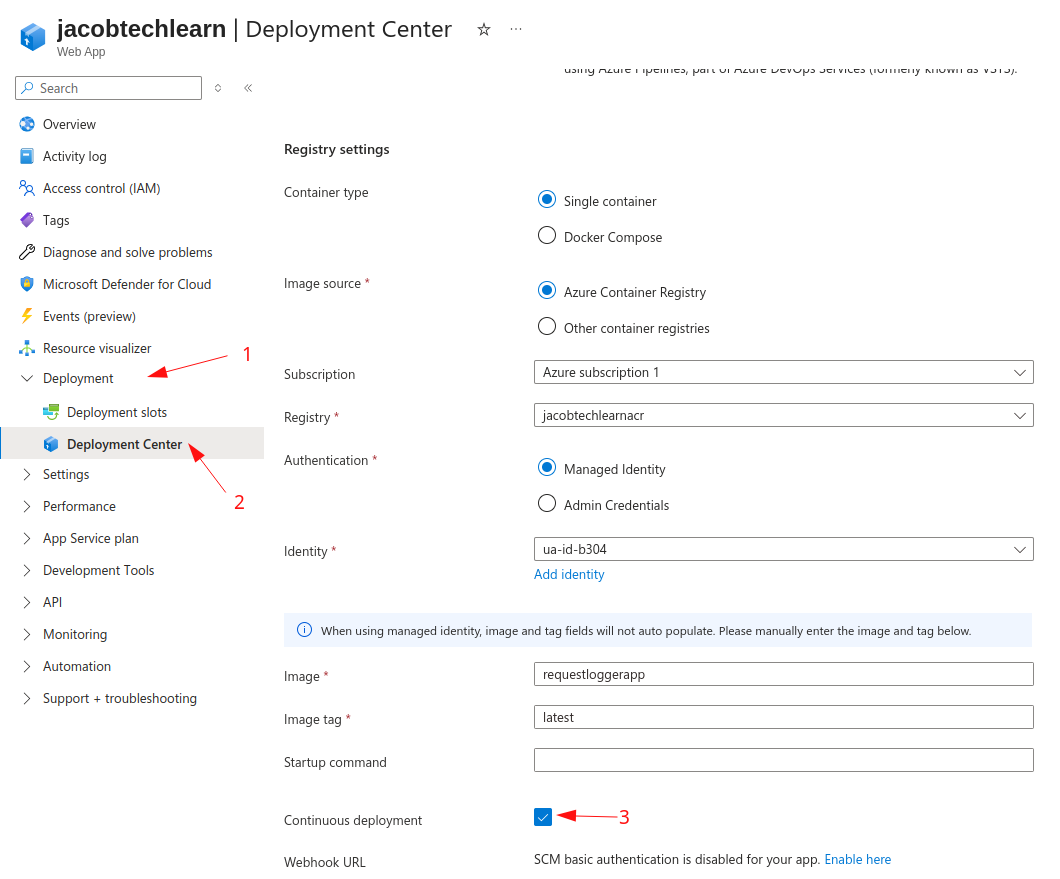
Enable Continuous Deployment
Although the app is now up and running, we should enable continuous deployment so that newer images are automatically pulled from ACR.
To do so go to the App Service -> Deployment -> Deployment Center and check the box next to the Continuous deployment attribute:
Create App Service using Azure CLI
Creating this setup with Azure CLI is a bit more complicated, mainly because we need to create each resource separately.
If you experience role assignment errors while running the script, try to create each resource separately. There is a small chance that AcrPull role assigment for user-assigned managed identity takes some time before it settles in Azure; therefore App Service will not be able to pull the image on the first try. You can either first apply the role assignment, wait a minute or two and then continue creating other resources, or you can just restart the App Service so that it pulls the image once again.
Run the following script to create the resources using Azure CLI (Adjust the variables as needed.):
#!/bin/bash

# ------------------------
# VARIABLES
# ------------------------
RESOURCE_GROUP="rg-svc"
ACR_RESOURCE_GROUP="rg-shared"
LOCATION="canadacentral"
APP_NAME="jacobtechlearn"
PLAN_NAME="asp-jacobtechlearn"
ACR_NAME="jacobtechlearnacr"
IMAGE_NAME="requestloggerapp:latest"
LOG_ANALYTICS_WORKSPACE="law-jacobtechlearn"
APP_INSIGHTS="appi-jacobtechlearn"
UAMI_NAME="umi-jacobtechlearn"

# ------------------------
# 1. Create Resource Group
# ------------------------
az group create \
  --name $RESOURCE_GROUP \
  --location $LOCATION

# ------------------------
# 2. Create Log Analytics Workspace
# ------------------------
az monitor log-analytics workspace create \
  --resource-group $RESOURCE_GROUP \
  --workspace-name $LOG_ANALYTICS_WORKSPACE \
  --location $LOCATION

# ------------------------
# 3. Create Application Insights linked to workspace
# ------------------------
az monitor app-insights component create \
  --app $APP_INSIGHTS \
  --location $LOCATION \
  --resource-group $RESOURCE_GROUP \
  --application-type web \
  --workspace $LOG_ANALYTICS_WORKSPACE

# ------------------------
# 4. Create App Service Plan (Linux)
# ------------------------
az appservice plan create \
  --name $PLAN_NAME \
  --resource-group $RESOURCE_GROUP \
  --sku F1 \
  --is-linux

# ------------------------
# 5. Create User-Assigned Managed Identity
# ------------------------
az identity create \
  --name $UAMI_NAME \
  --resource-group $RESOURCE_GROUP \
  --location $LOCATION

UAMI_ID=$(az identity show --name $UAMI_NAME --resource-group $RESOURCE_GROUP --query id -o tsv)
UAMI_PRINCIPAL_ID=$(az identity show --name $UAMI_NAME --resource-group $RESOURCE_GROUP --query principalId -o tsv)

# ------------------------
# 6. Grant UAMI AcrPull role on ACR
# ------------------------
ACR_ID=$(az acr show --name $ACR_NAME --resource-group $ACR_RESOURCE_GROUP --query id -o tsv)

az role assignment create \
  --assignee $UAMI_PRINCIPAL_ID \
  --scope $ACR_ID \
  --role AcrPull

# ------------------------
# 7. Create Web App with User-Assigned Managed Identity
# ------------------------
az webapp create \
  --resource-group $RESOURCE_GROUP \
  --plan $PLAN_NAME \
  --name $APP_NAME \
  --acr-use-identity \
  --acr-identity $UAMI_ID \
  --assign-identity $UAMI_ID \
  --container-image-name $ACR_NAME.azurecr.io/$IMAGE_NAME \

# ------------------------
# 8. Enable continuous deployment
# ------------------------
az webapp deployment container config \
  --name $APP_NAME \
  --resource-group $RESOURCE_GROUP \
  --enable-cd true

# ------------------------
# 9. Link Application Insights
# ------------------------
APP_INSIGHTS_CONNECTION_STRING=$(az monitor app-insights component show \
  --app $APP_INSIGHTS \
  --resource-group $RESOURCE_GROUP \
  --query connectionString -o tsv)

az webapp config appsettings set \
  --name $APP_NAME \
  --resource-group $RESOURCE_GROUP \
  --settings "APPLICATIONINSIGHTS_CONNECTION_STRING=$APP_INSIGHTS_CONNECTION_STRING"

echo "✅ Deployment complete!"
echo "App Service: $APP_NAME"
echo "App Insights: $APP_INSIGHTS"
echo "Log Analytics Workspace: $LOG_ANALYTICS_WORKSPACE"
echo "User-Assigned Managed Identity: $UAMI_NAME"
🚀Deploy the resources using Terraform

In this section, I’ll share my Terraform configuration for deploying the resources.
Out of all the options for creating the resources – Portal, AZ CLI and Terraform; Terraform definitely wins. It’s okay to deploy the resources using either Portal or CLI when it comes to debug or development scenarios or in cases where you just deploy one website and/or database to your tenant. However in production environment, it is highly recommended to use infrastructure as a code (IaaC).
Although in this post I used Terraform, you can also use Bicep when it comes to Azure. As bicep is developed by Microsoft, it often offers better features than Terraform. On the other hand, Terraform is more suitable for multi-cloud deployments.
I chose to use AVM (Azure verified modules) for the resources. There are multiple reasons behind this choice:
- AVMs are reviewed and tested by Microsoft
- Modules are designed with secure defaults
- Many AVMs implement policies that align with Azure’s Well-Architected Framework and common compliance needs.
- Avoids writing low-level Terraform for each Azure resource.
- Since AVMs are official, Microsoft provides documentation and guidance.
Although not required, it is highly recommended to use AVMs, whether for your own deployments or across your organization.
Terraform configuration (ensure that you specify your subscription ID):
terraform {
  required_version = ">= 1.3"

  required_providers {
    azurerm = {
      source  = "hashicorp/azurerm"
      version = ">= 3.80"
    }
  }
}

provider "azurerm" {
  subscription_id = ""
  features {}
}
variable "env" {
  type    = string
  default = "devl"
}

variable "region" {
  type    = string
  default = "polandcentral"
}

variable "prefix" {
  type    = string
  default = "loggerapp"
}

variable "container_image" {
  type    = string
  default = "requestloggerapp"
}

variable "container_tag" {
  type    = string
  default = "latest"
}

variable "acr_sku" {
  type    = string
  default = "Basic"
}

variable "service_plan" {
  type = object({
    os_type = string
    sku     = string
  })
  default = { os_type = "Linux", sku = "F1" }
}
# --------------------
# Resource Group for App Service resources
# --------------------

module "app_rg" {
  source   = "Azure/avm-res-resources-resourcegroup/azurerm"
  name     = "rg-${var.prefix}-${var.env}"
  location = var.region
  tags = {
    env = var.env
  }
}

# --------------------
# Resource Group for ACR
# --------------------

module "shared_rg" {
  source   = "Azure/avm-res-resources-resourcegroup/azurerm"
  name     = "rg-shared"
  location = var.region
}

# --------------------
# Log Analytics Workspace (AVM)
# --------------------
module "log_analytics" {
  source = "Azure/avm-res-operationalinsights-workspace/azurerm"

  resource_group_name                       = module.app_rg.name
  location                                  = var.region
  name                                      = "law-${var.prefix}-${var.env}"
  log_analytics_workspace_sku               = "PerGB2018"
  log_analytics_workspace_retention_in_days = 30
  log_analytics_workspace_internet_ingestion_enabled = true
  log_analytics_workspace_internet_query_enabled = true
  tags = {
    env = "devl"
  }
}

# --------------------
# Application Insights (AVM)
# --------------------
module "app_insights" {
  source = "Azure/avm-res-insights-component/azurerm"

  resource_group_name = module.app_rg.name
  location            = var.region
  name                = "appi-${var.prefix}-${var.env}"
  workspace_id        = module.log_analytics.resource_id
  application_type    = "web"
  tags = {
    env = "devl"
  }
}

# --------------------
# Azure Container Registry (AVM)
# --------------------
module "acr" {
  source = "Azure/avm-res-containerregistry-registry/azurerm"

  resource_group_name     = module.shared_rg.name
  location                = var.region
  name                    = "${var.prefix}acr"
  sku                     = var.acr_sku
  admin_enabled           = false
  zone_redundancy_enabled = false
}

# --------------------
# User Assigned Managed Identity (AVM)
# --------------------
module "uami" {
  source = "Azure/avm-res-managedidentity-userassignedidentity/azurerm"

  resource_group_name = module.app_rg.name
  location            = var.region
  name                = "uami-${var.prefix}-${var.env}"
  tags = {
    env = "devl"
  }
}

# --------------------
# Role assignment: give the UAMI AcrPull access on the ACR
# --------------------
module "acr_role_assignment" {
  source = "Azure/avm-res-authorization-roleassignment/azurerm"

  role_assignments_azure_resource_manager = {
    acrpull = {
      role_definition_name = "AcrPull"
      principal_id         = module.uami.principal_id
      scope                = module.acr.resource_id
    }
  }
}

# --------------------
# App Service Plan (AVM) — Linux, F1
# --------------------
module "app_service_plan" {
  source = "Azure/avm-res-web-serverfarm/azurerm"

  resource_group_name    = module.app_rg.name
  location               = var.region
  name                   = "${var.prefix}-asp"
  os_type                = var.service_plan.os_type
  sku_name               = var.service_plan.sku
  zone_balancing_enabled = false

  tags = {
    env = "devl"
  }
}

# --------------------
# Web App (App Service) (AVM) — runs custom container from the ACR
# We attach the UAMI (user-assigned identity) to the web app and configure the container image
# --------------------
module "web_app" {
  source                      = "Azure/avm-res-web-site/azurerm"
  version                     = "0.19.0"
  kind                        = "webapp"
  location                    = var.region
  name                        = "app-${var.prefix}-${var.env}"
  os_type                     = var.service_plan.os_type
  resource_group_name         = module.app_rg.name
  service_plan_resource_id    = module.app_service_plan.resource_id
  enable_application_insights = false
  managed_identities = {
    user_assigned_resource_ids = [module.uami.resource_id]
  }
  app_settings = {
    APPINSIGHTS_INSTRUMENTATIONKEY             = "${module.app_insights.instrumentation_key}"
    ApplicationInsightsAgent_EXTENSION_VERSION = "~3"
    DOCKER_ENABLE_CI                           = "true" # enable automatic image pull if new version is detected
  }

  logs = {
    app = {
      application_logs = {
        app = {
          file_system_level = "Verbose"
        }
      }
      http_logs = {
        app = {
          file_system = {
            retention_in_days = 7
            retention_in_mb   = 35
          }
        }
      }
      disk_quota_mb           = 50
      detailed_error_messages = true
      failed_request_tracing  = true
    }
  }
  site_config = {
    always_on                                     = true
    use_32_bit_worker                             = true
    container_registry_use_managed_identity       = true
    container_registry_managed_identity_client_id = module.uami.client_id
    application_stack = {
      docker = {
        docker_image_name   = "${var.container_image}:${var.container_tag}"
        docker_registry_url = "https://${var.prefix}acr.azurecr.io"
      }
    }
  }

  tags = {
    env = "devl"
  }
}
🧪Testing the application
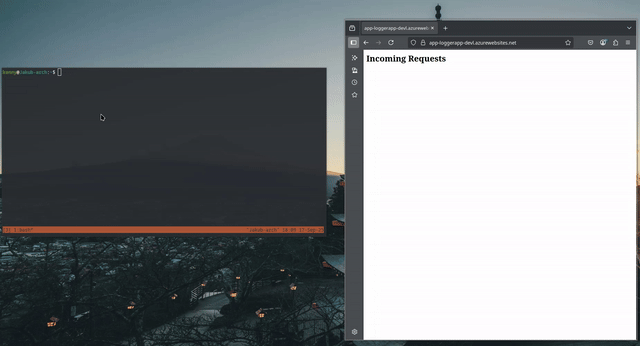
As I previously mentioned, the application is a simple logger, which displays request made to the “/test” endpoint and displays them on the root endpoint “/”.
For demonstration purposes, I’ll be using the curl command, but you can use any HTTP(S) client.
Testing the app:
Important - Note while using the different App Service Plan
If you choose to use different SKU than F1 make sure to set the maximal number of instances to only one !
Reason for this is that the application uses websockets to communicate with the browser. However, if your application scales to multiple instances, then you have no guarantee that your request will hit the same instance with which your browser initiated the websocket connection. This results in requests not being displayed in the browser even though the response from the application always arrives.
📚Resources
All resources related to this post are available at my github repository.
There are three folders:
- terraform – contains the Terraform configuration
- az_cli_script – contains two AZ CLI scripts used
- RequestLoggerApp – simple ASP .NET Core app logging HTTP(S) request using WebSockets
If you have any suggestions feel free create an issue or a pull request.
📝Conclusion
Azure App Service combined with containers offers a modern, efficient approach to deploying applications in the cloud. By leveraging containers, you gain portability, consistent environments, and faster release cycles, while App Service takes care of infrastructure, scaling, and monitoring. Using tools like Azure Container Registry, managed identities, and CI/CD pipelines, you can automate deployments securely and reliably.
Whether you’re experimenting in a development environment or running production workloads, this setup provides a strong foundation for building cloud-native applications that are both scalable and easy to maintain.