
When building secure solutions in Azure, controlling how resources are accessed is just as important as configuring the resources themselves. By default, services like Storage Accounts, Key Vaults, and SQL Databases are accessible over the public internet — even if they require authentication. This is where Azure Private Endpoints come in
In this post, I will:
- Explain Azure Private Endpoints
- Configure them using Azure portal as well as Terraform
- Compare them to well-known service endpoints
💡Private endpoint and private link
A Private Endpoint lets me map a resource to a private IP address inside my Virtual Network, so traffic flows privately within Microsoft’s backbone network instead of over the internet.
Using Private Endpoints, I can:
Keep sensitive resources completely off the public internet
Ensure only workloads inside approved VNets can access them
Simplify compliance and security audits by proving end-to-end private connectivity
A Private Link is the underlying technology that makes Private Endpoints work.
It provides the secure connection between:
Your VNet (via the Private Endpoint)
The Azure service (e.g., SQL, Storage, Key Vault, or even a Partner/Customer service)
As you can see, these two concepts together establish a private connection to your own resources. You can think of it like this: your resources need to connect to your SQL database, which is not exposed to the internet. To do so, they use private endpoints, which are powered by Azure Private Link.
Bonus: A Private Link Service – although out of the scope of this post, I will also mention it. This service allows multiple private endpoints to connect to your resources via Azure Load Balancer. It is designed to provide your services to multiple customers to learn more visit Microsoft documentation.
🧱 Scenario - example of protecting the SQL database
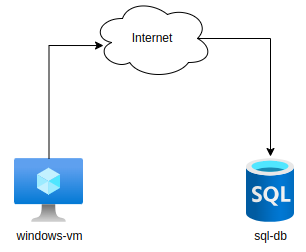
The illustration below shows a typical use case for Private Endpoints. Let’s assume a virtual machine periodically backs up the Azure SQL Database.
In the picture on the left, the VM connects to SQL over its public endpoint. The traffic between these two resources goes via public Internet.
This introduces security risks, such as:
Exposing the SQL database to the public Internet
No VNet-level isolation, so any client with credentials can connect
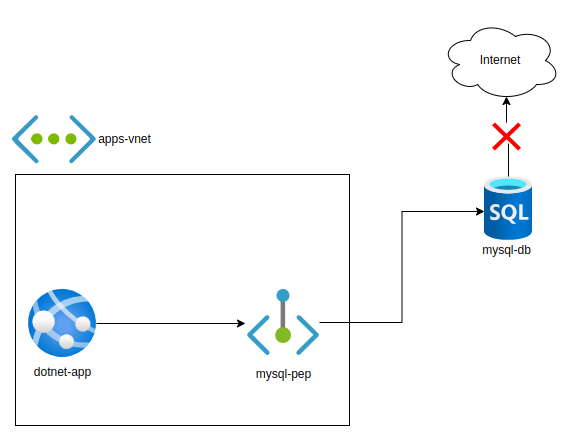
Using Private Endpoints solves these issues by giving the SQL database a private IP inside a VNet, ensuring only approved resources can access it. Now, VM connects to database over Azure network, not leaving a VNET at all (source as well as destination IPs stay private).
Without private endpoint:
With private endpoint:
Prerequisite resources:
This part assumes that you have already created all previously mentioned resources except the private endpoint. Therefore VM, SQL server as well as database should already be running. If not, please create them and proceed with tutorial. VM should run on Windows (any type), because I will be connecting to Azure SQL database with commands available only on Windows. As you create Windows VM, make sure to assign it public IP (vnet as well as subnet will be created for you while you create the VM). Make sure to disable public access on SQL server as we will provide access using private endpoint.
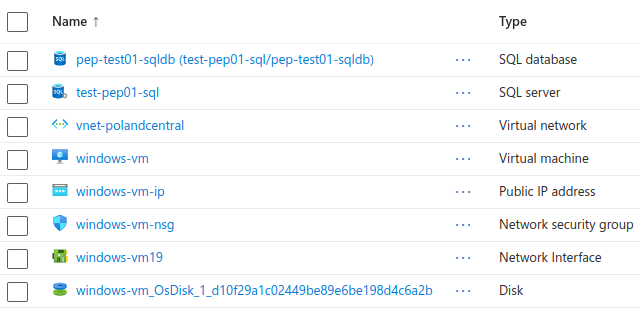
Prerequisite resources before implementing private endpoint:
Note: It does really matter whether you create same or slightly different resources. The point of this tutorial is to secure the database so that public access is disabled and connection is possible only through the private endpoint.
Optional: I also used RBAC for managing identity access to SQL server. I recommend using it, as it is both a best practice and one of the most effective ways to secure your resources. For the sake of this tutorial, I created resources with minimal performance/redundancy. Therefore the database is only LRS and it runs on DTU model. Make sure to disable public internet access while creating Azure SQL server.
Creating private endpoint in portal
Now that we have necessary resources it is time to creatime a private endpoint.
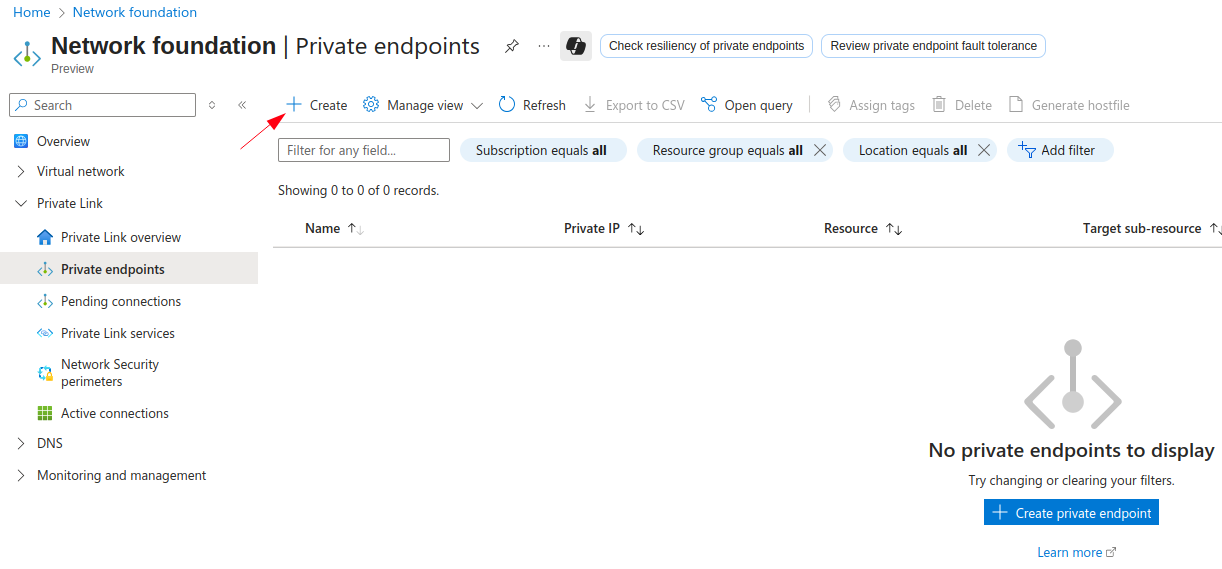
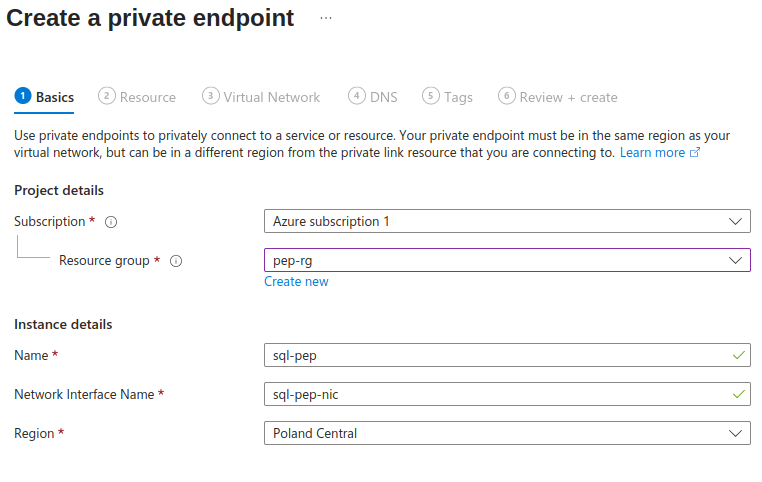
1. First, search for private endpoints in Azure Portal -> Click Create:
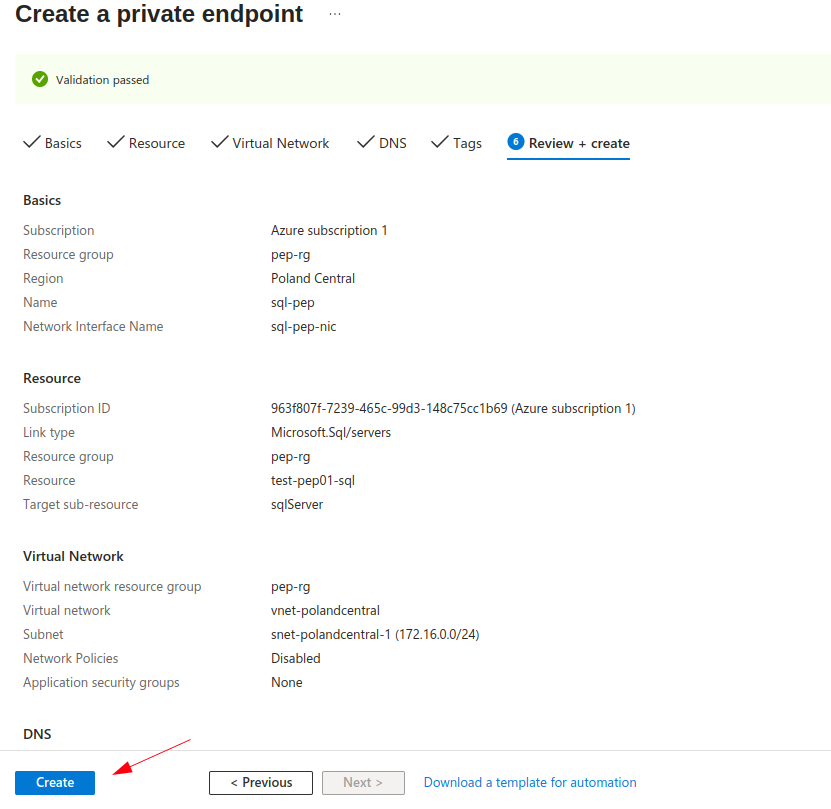
2. Select your subscription, resource group, name for the private endpoint as well as for the new network interface.
(new NIC will be paired with private endpoint and will be assigned dynamic IP for subnet)
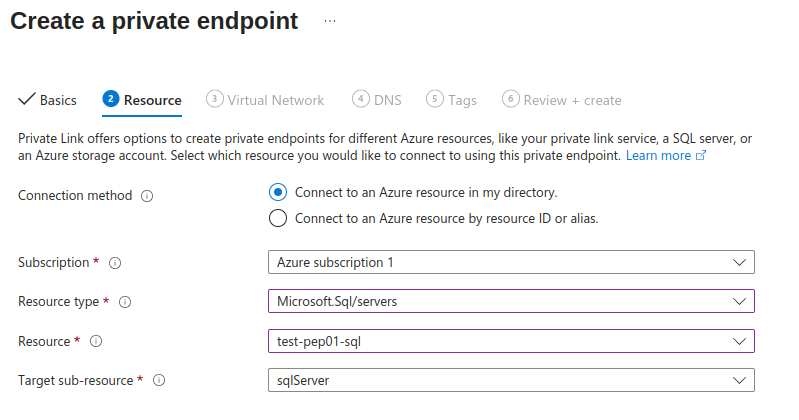
3. Select resource for which is the private endpoint created. In this example, it is our sql server instance, therefore Microsoft.Sql/servers resource type.
In this case, only one target sub-resource is available: sqlServer. However if we were to created private endpoint for other resource, such as Azure blob storage, we could choose from Azure Files, Azure Blob containers, etc.
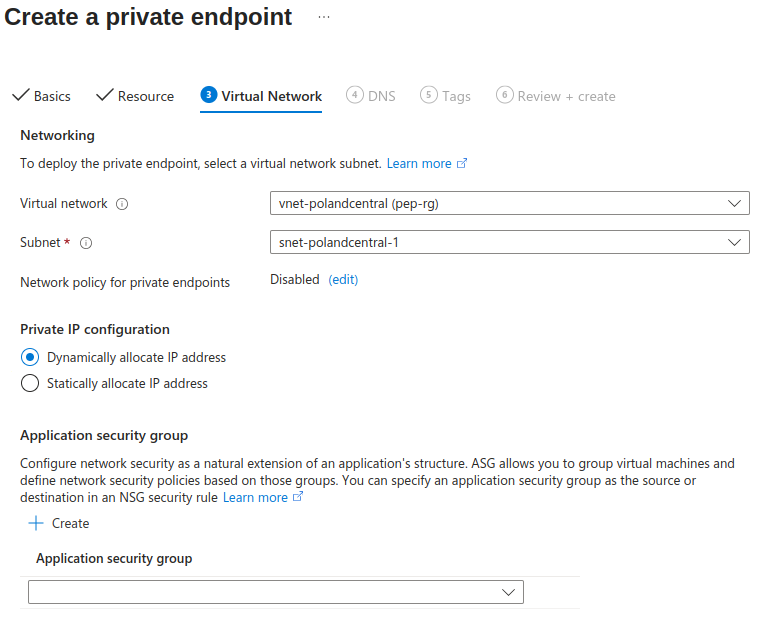
4. Select VNET as well as subnet for private endpoint. Make sure to select the same VNET as VNET in which your virtual machine resides. In this scenario, it does not matter whether you choose same subnet or different one – I selected the same subnet as the one used by my VM..You may choose to statically assign an IP address to the NIC. In my case, I opted for dynamic IP allocation.
If you were to enforce some security measures with NSGs (network security groups) or ASGs (application security groups), you might want to create the new subnet for the endpoint.
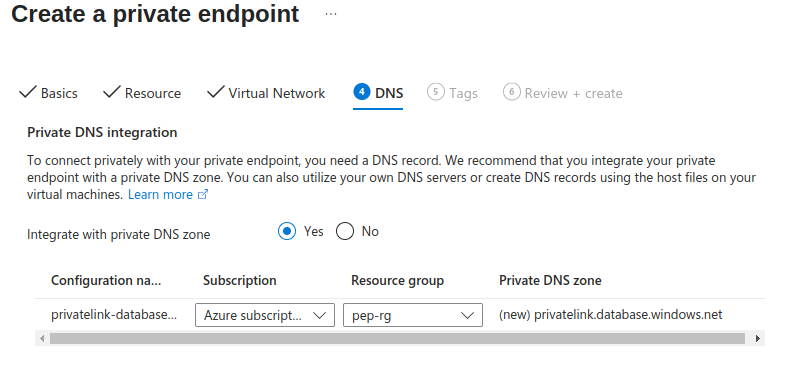
5. Configure the DNS private zone – by creating the zone, it is possible to use FQDN instead of the private IP. This is desired option, as FQDNs are easier to work with than private IPs. In some scenarios (as in this one), it is even required to have private DNS zones and to use FQDNs instead of IPs – later, when we connect to the SQL server, the server uses TLS certificate for encryption, which also uses FQDN. This option automatically creates the private DNS zone, links it to VNET and also creates the DNS record for our SQL server.
6. Finally, we skip the tags, review the settings, and create the private endpoint along with its associated resources.
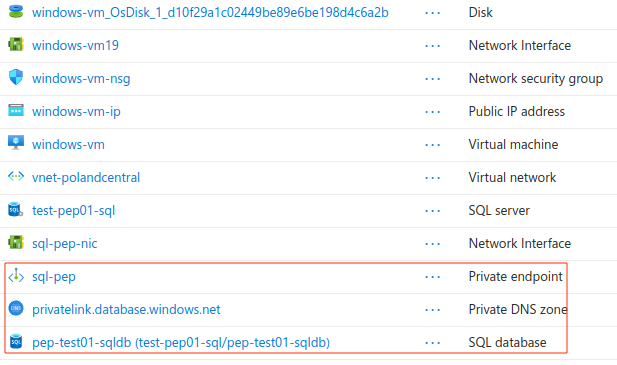
After we are done creating the private endpoint, the resource group now contains three new resources:
- private endpoint (sql-pep)
- network interface attached to private endpoint (sql-pep-nic)
- private dns zones which resolves private IP address of SQL server (privatelink.database.windows.net)
Connecting to the database via the virtual machine
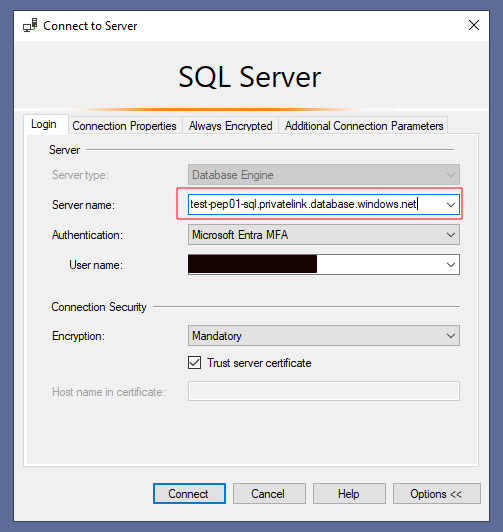
Now that everything is set up, we can try connect to our newly created database. In my case, I use Windows Sever 2022 VM. As I said previously, I used Entra ID authentication to further secure the database. Therefore, I also needed to download SSMS studio to use this feature. However, If you chose to use SQL credentials you can use any compatible client.
Connection parameters:
Make sure to check the “Trust server certificate” option to connect to the server.
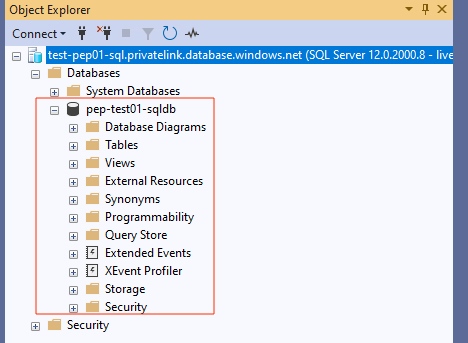
After connecting to the SQL Server, the available databases are displayed:
Bonus: Effective Routes
A network interface’s effective routes include Azure’s default routes, any custom routes you set up, and routes learned from your on-premises network through an Azure VPN gateway using BGP. To learn more about effective routes, visit Microsoft’s documentation.
Effective routes are available for each network interface. Go to the network interface -> Help -> Effective routes.
After we added the private endpoint, the subsequent network interfaces belonging to the private endpoint’s VNET were updated with the effective route. This newly-added route essentially tells the network interface to use the private endpoint when it wants to reach created SQL database.
If we were to allow the access to the public internet for SQL database instead of using the private endpoint, our next hop would be the Internet: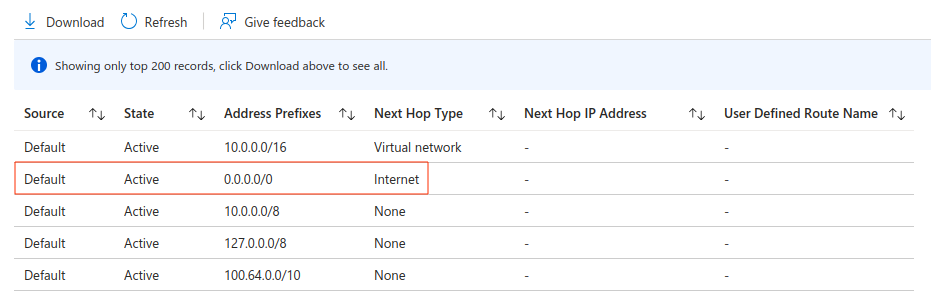
As you can see, Azure also denies hops to addresses such as 127.0.0.0/8 or 10.0.0.0/8 – these are special types of IP addresses. First one is loopback and second one conflicts with our VNET range, which route is defined in the top of the table.
Terraform implementation
In this section I provide the necessary Terraform files for creating resources mentioned previously.
Besides subtle changes, notice that I also used Azure naming module to enforce naming convention. I highly recommend using this module as it provides better visibility as well as it better organizes your resources. In this scenario, I also used it’s suffix feature, so that every resource ends with “-devl” suffix, indicating this is the development environment.
Also, notice that I the virtual machine password through a variable called vm_password. For this, I used an environment file named .env, which I then sourced into my shell using the source .env command. Using this file, the password itself is not stored in any of the Terraform files. You can optionally also use .tfvars file. However, both of these approaches still store passwords in Terraform’s state, so be aware of it ! Ideally, you would use Azure keyvault for storing/creating password. By using keyvault, the password are not stored in terraform state as they are now.
export TF_VAR_vm_password="your_vm_password"terraform {
required_version = ">=1.0"
required_providers {
azapi = {
source = "azure/azapi"
version = "~>1.5"
}
azurerm = {
source = "hashicorp/azurerm"
version = "~>4.35"
}
random = {
source = "hashicorp/random"
version = "~>3.0"
}
}
}
provider "azurerm" {
subscription_id = ""
features {}
}
variable "resource_group_location" {
  type        = string
  default     = "polandcentral"
  description = "Location for the resource group."
}

# VM properties
variable "vm_size" {
  type        = string
  default     = "Standard_D2s_v3"
  description = "Free services eligible VM size"
}

variable "vm_image_publisher" {
  type        = string
  default     = "microsoftwindowsserver"
  description = "Publisher for VMs"
}

variable "vm_image_offer" {
  type        = string
  default     = "windowsserver"
  description = "Offer for VMs"
}

variable "vm_image_sku" {
  type        = string
  default     = "2022-datacenter-azure-edition-hotpatch"
  description = "SKU for VM"
}

variable "vm_image_version" {
  type        = string
  default     = "latest"
  description = "Version for VM image"
}

# VM creds
variable "vm_username" {
  type        = string
  default     = "windows_user"
  description = "Username for VM"
}

variable "vm_password" {
  type        = string
  description = "Password for VM"
}
# Naming conventions
module "naming" {
  source = "Azure/naming/azurerm"
  suffix = ["devl"]
}

# Resource group
resource "azurerm_resource_group" "this" {
  location = var.resource_group_location
  name     = module.naming.resource_group.name
}

# Virtual Network for Windows VM
resource "azurerm_virtual_network" "this" {
  name                = module.naming.virtual_network.name
  address_space       = ["10.0.0.0/16"]
  location            = azurerm_resource_group.this.location
  resource_group_name = azurerm_resource_group.this.name
}

# Subnet for VM as well as private endpoint
resource "azurerm_subnet" "this" {
  name                 = "windows-vms-${module.naming.subnet.name}"
  resource_group_name  = azurerm_resource_group.this.name
  virtual_network_name = azurerm_virtual_network.this.name
  address_prefixes     = ["10.0.0.0/24"]
}

# Create public IP for windows virtual machine
resource "azurerm_public_ip" "this" {
  name                = "windows-vm-${module.naming.public_ip.name}"
  location            = azurerm_resource_group.this.location
  resource_group_name = azurerm_resource_group.this.name
  allocation_method   = "Static"
  sku                 = "Standard"
}

# Create Network Security Group and rule for RDP access
resource "azurerm_network_security_group" "this" {
  name                = "windows-vm-${module.naming.network_security_group.name}"
  location            = azurerm_resource_group.this.location
  resource_group_name = azurerm_resource_group.this.name

  security_rule {
    name                       = "RDP"
    priority                   = 1001
    direction                  = "Inbound"
    access                     = "Allow"
    protocol                   = "Tcp"
    source_port_range          = "*"
    destination_port_range     = "3389"
    source_address_prefix      = "*"
    destination_address_prefix = "*"
  }
}

# Create network interface and associate it with network security group
resource "azurerm_network_interface" "this" {
  name                = "windows-vm-${module.naming.network_interface.name}"
  location            = azurerm_resource_group.this.location
  resource_group_name = azurerm_resource_group.this.name

  ip_configuration {
    name                          = "windows-vm-nic-configuration"
    subnet_id                     = azurerm_subnet.this.id
    private_ip_address_allocation = "Dynamic"
    public_ip_address_id          = azurerm_public_ip.this.id
  }
}

resource "azurerm_network_interface_security_group_association" "this" {
  network_interface_id      = azurerm_network_interface.this.id
  network_security_group_id = azurerm_network_security_group.this.id
}

# Create windows virtual machine
resource "azurerm_windows_virtual_machine" "this" {
  name                            = "windows-${module.naming.virtual_machine.name}"
  admin_username                  = var.vm_username
  admin_password                  = var.vm_password
  location                        = azurerm_resource_group.this.location
  resource_group_name             = azurerm_resource_group.this.name
  network_interface_ids           = [azurerm_network_interface.this.id]
  size                            = var.vm_size

  os_disk {
    caching              = "ReadWrite"
    storage_account_type = "Standard_LRS"
  }

  source_image_reference {
    publisher = var.vm_image_publisher
    offer     = var.vm_image_offer
    sku       = var.vm_image_sku
    version   = var.vm_image_version
  }
}

# Get the currently authenticated Azure AD user
data "azuread_client_config" "current" {}

data "azuread_user" "this" {
  object_id = data.azuread_client_config.current.object_id
}

# Create SQL server
resource "azurerm_mssql_server" "this" {
  name                         = "test-${module.naming.sql_server.name}"
  resource_group_name          = azurerm_resource_group.this.name
  location                     = azurerm_resource_group.this.location
  public_network_access_enabled = false

  azuread_administrator {
    login_username = data.azuread_user.this.user_principal_name
    object_id = data.azuread_user.this.object_id
    azuread_authentication_only = true
  }
  version                      = "12.0"
}

# Create SQL database
resource "azurerm_mssql_database" "this" {
  name      = "test-${module.naming.mssql_database.name}"
  server_id = azurerm_mssql_server.this.id
  sku_name = "Basic"
  storage_account_type = "Local"
}

# Create private endpoint for SQL server
resource "azurerm_private_endpoint" "this" {
  name                = "sql-${module.naming.private_endpoint.name}"
  location            = azurerm_resource_group.this.location
  resource_group_name = azurerm_resource_group.this.name
  subnet_id           = azurerm_subnet.this.id

  private_service_connection {
    name                           = "sql-private-serviceconnection"
    private_connection_resource_id = azurerm_mssql_server.this.id
    subresource_names              = ["sqlServer"]
    is_manual_connection           = false
  }

  private_dns_zone_group {
    name                 = "sql-dns-zone-group"
    private_dns_zone_ids = [azurerm_private_dns_zone.this.id]
  }
}

# Create private DNS zone
resource "azurerm_private_dns_zone" "this" {
  #name                =  module.naming.private_dns_zone.name
  name                = "privatelink.database.windows.net"
  resource_group_name = azurerm_resource_group.this.name
}

# Create virtual network link to the private DNS zone
resource "azurerm_private_dns_zone_virtual_network_link" "my_terraform_vnet_link" {
  name                  = "vnet-link"
  resource_group_name   = azurerm_resource_group.this.name
  private_dns_zone_name = azurerm_private_dns_zone.this.name
  virtual_network_id    = azurerm_virtual_network.this.id
}
output "sql_server_name" {
  value = azurerm_mssql_server.this.name
}

output "private_endpoint_dns_record" {
  value = "${azurerm_mssql_server.this.name}.${azurerm_private_dns_zone.this.name}"
}

output "windowsvm_public_ip" {
  value = azurerm_public_ip.this.ip_address
}
Output from terraform apply command:
💲Private endpoint pricing
When it comes to pricing, Azure charges fees for the private endpoint itself, as well as for both inbound and outbound data that is processed. As you can see below, fees for the private endpoint are negligible:
- Source: Microsoft
- Note: The displayed price is for East US region. Prices across regions can differ.
❓Private vs Service endpoints, which one to choose
Although both services provide different capabilities, they also have different use cases.
Service endpoints
Service endpoints were first to introduce the means of connecting to Azure services from VNETs. They allow the resources to connect from chosen subnets. To do so, the subnet must be delegated.
Although traffic from resources to services traverses through Microsoft’s Azure backbone, the service still uses it’s public IP. You can use firewall rules to limit the access only from the delegated subnets, but the IP is still presented to public Internet. Also, the subnet is delegated to use all Azure services, not just your ones – for example, it can be delegated to use all Azure Storage accounts, not just the ones in your control. This might present security risks when connecting from the delegated subnet. However, to mitigate this risk you can use service endpoints policies.
Service Endpoints are limited to the region of your VNET. If your resources fail over to a different region, you must manually set up new Service Endpoints.
Private endpoints
Generally speaking, private endpoints are new concept and are also recommended by Microsoft (visit the link). They allow for more granular control – for example, they give you control to connect only to specific blobs of Azure Storage Account. Also, they allow to connect to your services from on-prem resources. Using private endpoints, your resources connect to service using its private IP address, therefore the public IP can be disabled. Also, while communicating via private endpoints, the traffic never leaves your VNET and therefore never traverses the Azure Backbone’s network or Internet – it uses the Azure network itself (does not have to traverse the backbone). Because the connection uses a private IP, it adds an extra layer of security by blocking any traffic to or from public networks.
To use Azure Private Endpoint, you need to set up the private DNS zone as well, which can present some overhead. On top of that, the traffic which goes through private endpoint is billed based on the amount of data as opposed to service endpoints, which are free.
Choice between private and service endpoints
Both Service Endpoints and Private Endpoints offer distinct features, each with its own advantages and trade-offs. The choice depends on your specific requirements and goals. The table below summarizes the key differences between Service and Private Endpoints:
| Feature / Consideration | Service Endpoints | Private Endpoints |
|---|---|---|
| Connection type | Connects to Azure services using public IPs | Connects to Azure services using private IPs |
| Subnet delegation | Required; subnet delegated to service type (e.g., all Storage accounts) | Not required for entire subnet; can target specific resources |
| Granularity | Less granular; can connect to all service instances in a region | Highly granular; can connect to specific resources (e.g., specific blob/container) |
| Traffic path | Goes over Azure backbone but still uses public IP | Stays entirely within VNet; never leaves Azure private network |
| Firewall control | Can limit access using service endpoint policies | Access controlled via NSGs and private IP; public IP can be blocked |
| Cross-region support | Limited to the VNet region; manual setup needed for failover | Can support cross-region or on-prem access (requires DNS setup) |
| Security | Public IP exposure; risk if subnet is delegated broadly | Extra security layer; blocks traffic to/from public networks |
| DNS configuration | No additional DNS setup needed | Requires private DNS zone setup, adds overhead |
| Cost | Free | Billed per data processed through private endpoint |
| Recommended for | Simpler scenarios, regional connectivity, and minimal setup | High-security scenarios, specific resource access, cross-region/on-prem access |
Use Service Endpoints when you need quick, regional access to Azure services from your VNet, with minimal setup, and public IP exposure is acceptable. They are ideal for general access to all resources of a service within a region.
Use Private Endpoints when you need granular, secure access to specific resources, want traffic to stay entirely within your VNet (no public IPs), or need on-prem connectivity. They provide better security but require DNS setup and incur data-based costs. They can also be used to implement a zero-trust access model.
📝Conclusion
When building secure solutions in Azure, controlling how resources are accessed is as important as configuring the resources themselves. By default, many Azure services are exposed over the public internet, even if authentication is required. Private Endpoints provide a robust way to secure these services by mapping them to private IP addresses within your VNet, ensuring traffic never leaves the Azure network and is inaccessible from the public internet.
While Service Endpoints offer a simpler, regional solution that still uses public IPs, Private Endpoints provide granular, secure, and private connectivity, including support for on-premises access. Choosing between the two depends on your requirements: use Service Endpoints for quick, regional access with minimal setup, and Private Endpoints when security, isolation, and fine-grained access control are priorities.
Ultimately, leveraging Private Endpoints alongside Azure Private Link enhances security, simplifies compliance, and ensures your resources remain private within your network.